

OP Manager User Manual
Applicable app version: V2.1.41
This manual describes the UI and workflows on Android / iOS / Windows / macOS for this version. After UI updates, follow the in-app copy and refresh this manual against the version number.
Product page: OP Manager · Installation steps: OP Manager Installation Guide.
Contents
- 1. Overview
- 2. Installation and launch
- 3. Mobile use (home and connection)
- 4. Desktop use
- 5. Device home and parameter groups
- 6. Parameter editing and save behavior
- 7. System settings
- 8. Bluetooth settings
- 9. Baud rate / communication parameters
- 10. Configuration management
- 11. File management
- 12. Firmware upgrade
- 13. Languages
- 14. System reset
- 15. FAQ and version information
1. Overview
OP Manager is the companion management app for OP-BT / OP-BTS series optical probe devices. It runs on phones, tablets, and PCs. For more product information, see the OP Manager product page.
| Platform | Primary connection methods |
|---|---|
| Android / iOS (mobile) | Classic Bluetooth SPP, Bluetooth Low Energy (BLE) |
| Windows / macOS (desktop) | BLE; serial (including Bluetooth virtual serial); USB (UI shows Coming soon, not available yet) |
Main capabilities:
- Device discovery and connection status monitoring
- System information and system / Bluetooth / communication parameter configuration
- Remote device file management (default browse path
/py) - Configuration import and custom parameter file tools
- Firmware upgrade (online latest or local
.fw) - Multilingual UI (7 languages)
This manual is organized as one document with platform-specific sections: connection and shell are covered in §3 / §4; after the device home screen, features are largely the same on both ends.
2. Installation and launch
For system requirements, store / zip install steps, macOS Gatekeeper first-open notes, and mobile first-launch and permission flows, see the full OP Manager Installation Guide.
Brief notes:
- Android / iOS: Install OP Manager from the official app stores.
- Windows: Microsoft Store and zip manual distribution coexist (independent install entities).
- macOS: Obtain the package from your vendor (file name similar to
OP-Manager-macos-v2.1.41.zip); if the first open is blocked by the system, follow the Gatekeeper steps in the Installation Guide. - After installation, return to this manual and start connecting from §3 (mobile) or §4 (desktop).
3. Mobile use (home and connection)
3.1 Home screen
- The center shows a discovery entry icon with the copy Tap to start discovering devices, and a hint below: Please make sure Bluetooth is on.
- Top bar: back area and a language button (no legacy “more menu” entry).
- The bottom may show the ZENOVATE mark and the app version.
Tap the center area to open the device list and start scanning.
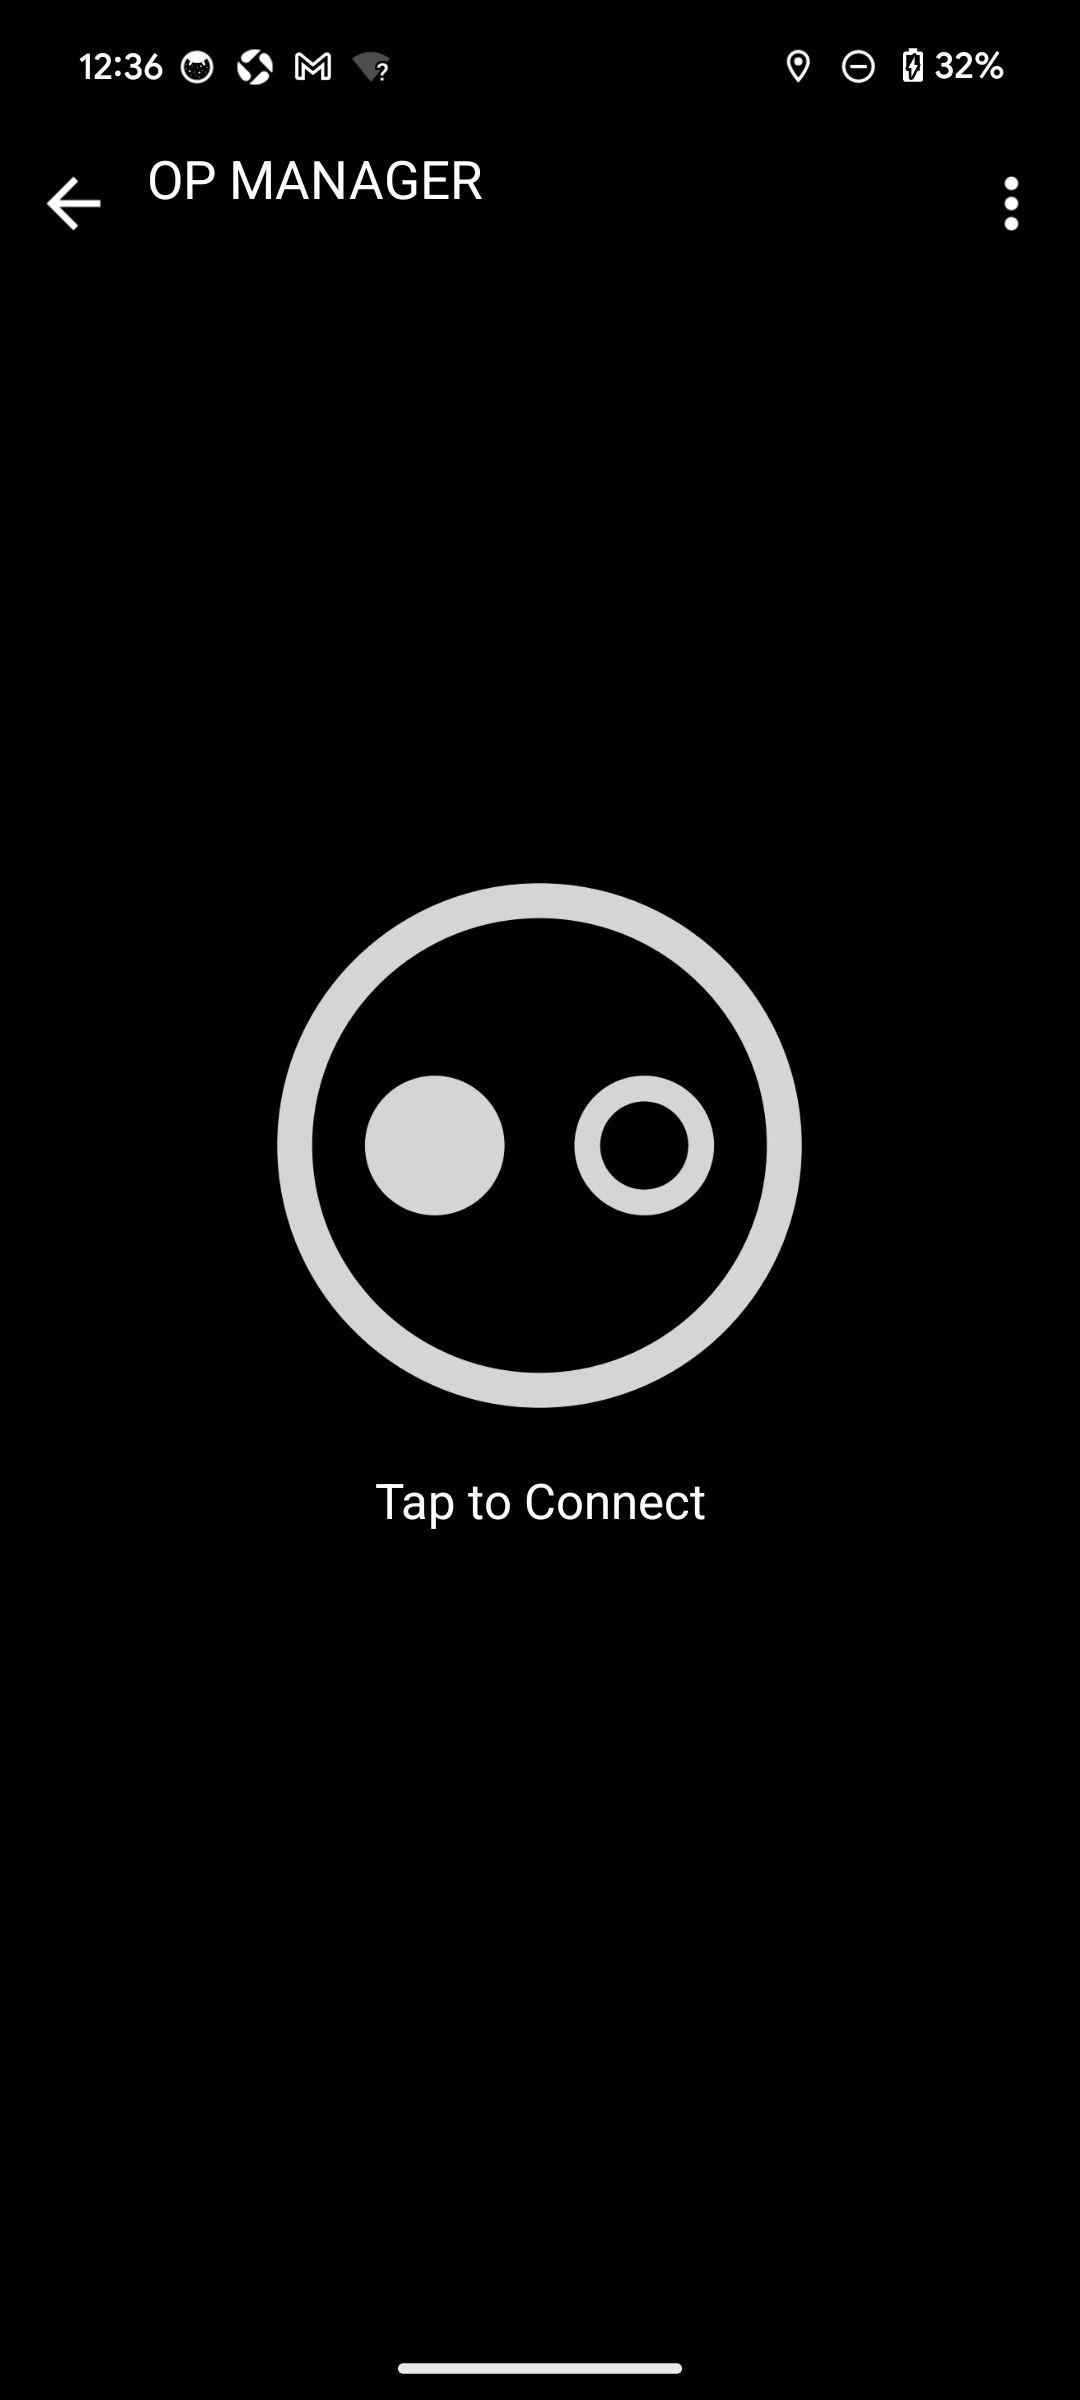
Mobile home (disconnected)
3.2 Device list
- Scanning starts automatically when the list opens (about 15 seconds timeout); you can refresh to scan again.
- The list shows nearby devices; items already paired with the system are labeled Paired at the end of the row (no separate “paired section”).
- Show all devices: when checked, filtering is relaxed so more scan results appear.
- The page shows Found N devices (N is the count).
- Android: you can filter by SPP / BLE.
- The bottom provides a Buy a device entry (opens purchase-related pages).
Names containing SPP are usually classic Bluetooth; those containing BLE are Bluetooth Low Energy. Tap a target device to open the device home and start connecting.
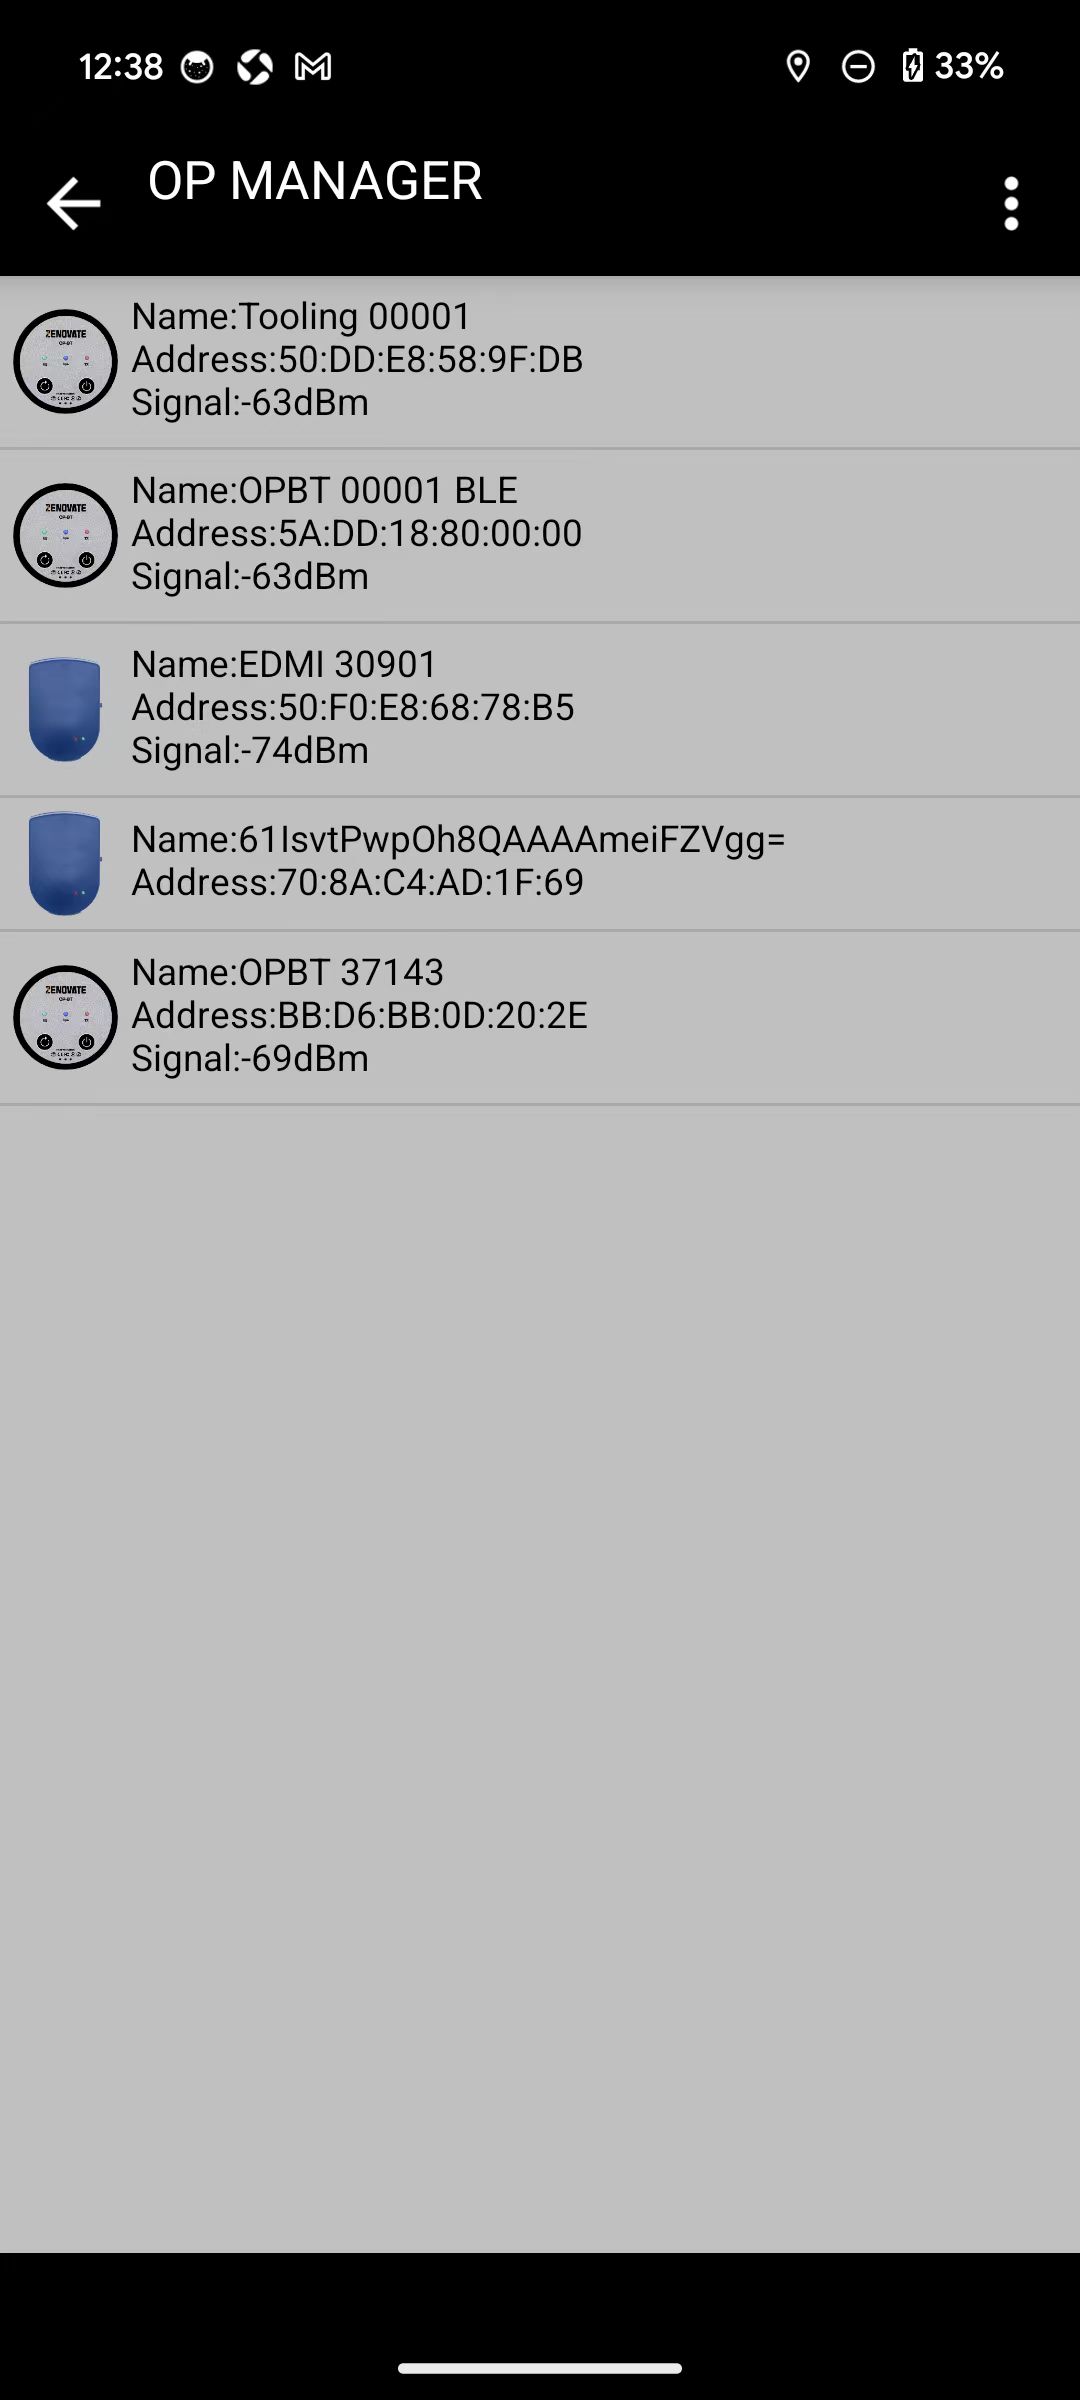
Device discovery / search list
3.3 Connection status and Pill button
The two status lines at the top of the device home are roughly:
- Bluetooth:
Connected (SPP)orConnected (BLE), etc. - Device:
Entering parameter mode...→Reading configuration...→Connected
On connection failure, the UI shows Connection failed, go back; you can return to the device list.
The Pill button in the middle of the home screen:
| State | Button label | Behavior |
|---|---|---|
| Connected | Disconnect | Disconnect the current session |
| Disconnected / failed | Connect | Start or retry connection |
| Connecting | Shows current status text | Button disabled |
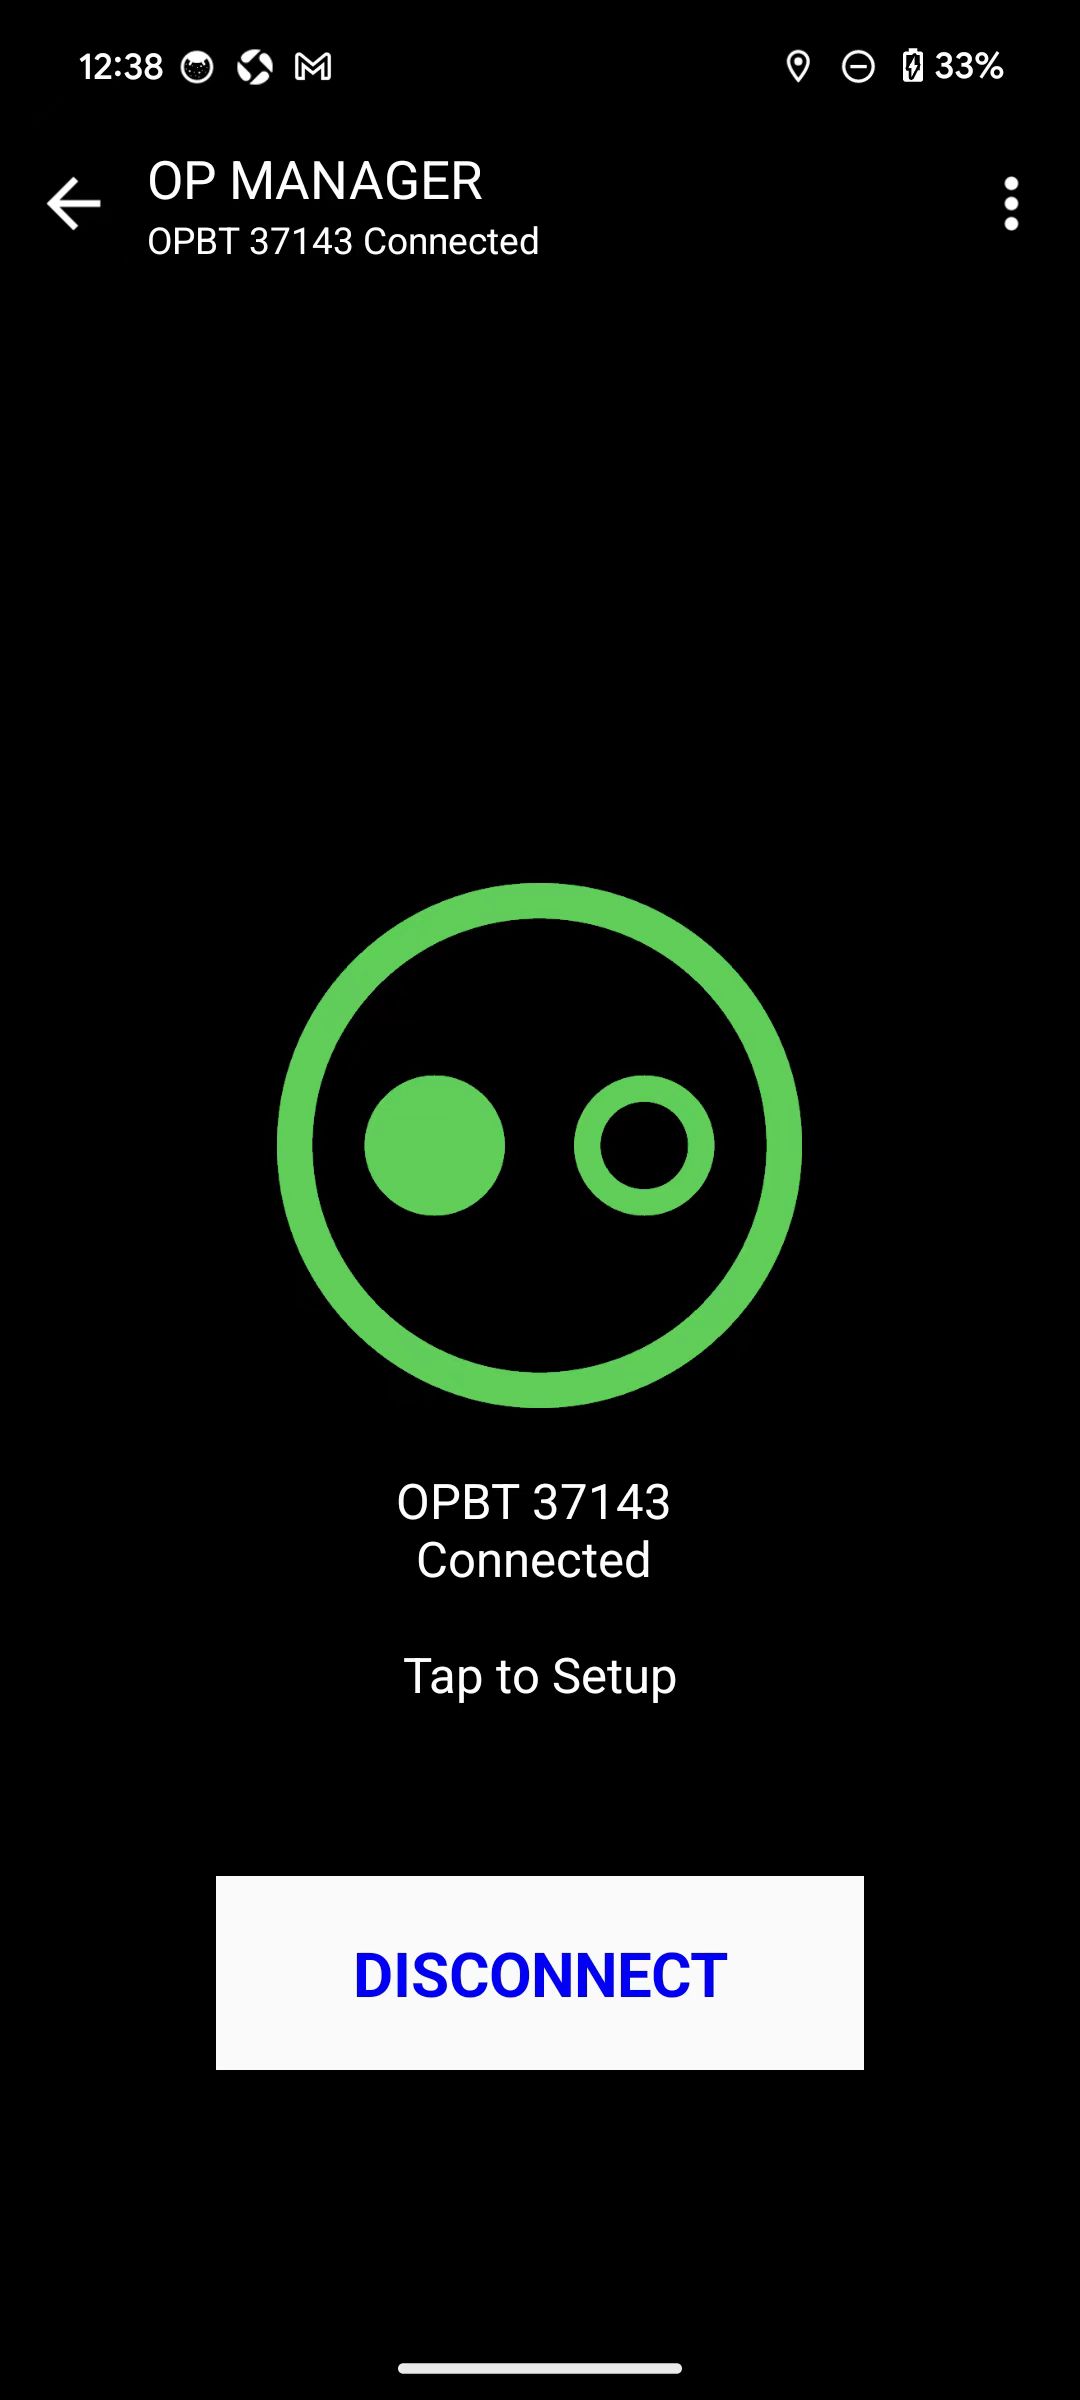
Device home (connected)
3.4 Back and disconnect confirmation
When you tap Back on the device home (or use the system back gesture), a confirmation appears: Disconnect and return to device discovery? Confirming disconnects and returns to the discovery flow.
3.5 Device hero image
A loading skeleton may appear during connection; after connect, the product image matches whether the device has a screen (including model-specific color variants). The image is for model identification only and is not part of parameter editing.
4. Desktop use
4.1 Window layout
The desktop app uses a two-pane shell: the left pane (~280 px) covers discovery / connection and the device sidebar; the right pane shows feature content. Entry is via the desktop-native app (not the mobile UI).

Screenshot pending: desktop two-pane window layout
4.2 Connection methods
On the left you can choose:
- Bluetooth: selecting it starts a BLE scan; you can toggle Show all devices; an empty list shows No devices found.
- Serial: available on Windows / macOS. Select a port and configure:
- Baud rate: default 9600 (options roughly 300…1152000)
- Data bits: default 8 (7 / 8)
- Parity: default None
- Stop bits: default 1
- Windows port list often looks like:
COMx - Bluetooth device nameorCOMx - friendly name
- USB (desktop connection channel): grayed out, labeled Coming soon, unavailable in the current version. This is an app-shell connection option, not the same as the device USB communication mode in System settings.

Screenshot pending: desktop Bluetooth scan panel

Screenshot pending: desktop serial connection and parameters
After selecting a device or confirming serial parameters, the connection flow starts. The connecting panel shows a spinner, device name, and status text, with no Cancel button—wait until it finishes or fails.
4.3 App settings dialog
Open via:
- The gear icon in the window
- Windows: Ctrl+,
- macOS: ⌘,
Configurable:
- Upload packet size: default 100, range about 20–2048
- Download packet size: default 500, range about 20–4096
- Download directory
- UI language (7 languages; takes effect immediately, no restart)

Screenshot pending: app settings dialog (packet size / download directory / language)
4.4 Window and tray behavior
- Windows: closing the window hides to the tray by default; the tray menu includes Show window and Quit.
- macOS: closing the window does not quit the app; use ⌘N to open a window again.
4.5 Device sidebar
After a successful connection, the sidebar shows the product image and two status layers:
- Link layer: e.g.
Connected (BLE)/Connected (Serial) - Device layer: parameter mode / connected, etc. (progress semantics similar to mobile)
Serial connections may show the current baud rate. The Manual button can open related online documentation pages.

Screenshot pending: desktop device home and sidebar
5. Device home and parameter groups
When the connection is ready, both mobile and desktop device home screens provide 5 entries (labels may differ slightly by platform; follow the in-app UI):
| Entry (common mobile labels) | Description |
|---|---|
| System information | Read-only device info; see below |
| Settings | Opens the System settings parameter page (card says “Settings”; page title is “System settings”) |
| Baud rate (desktop may say “Baud rate settings”) | Communication ports / preset baud rates |
| Files | Remote file system; see §11 |
| Advanced settings | Bluetooth settings, reset, firmware, import configuration, etc.; see below |
While the connection is not fully ready, some entries are grayed out—wait until the device side shows Connected before using them.
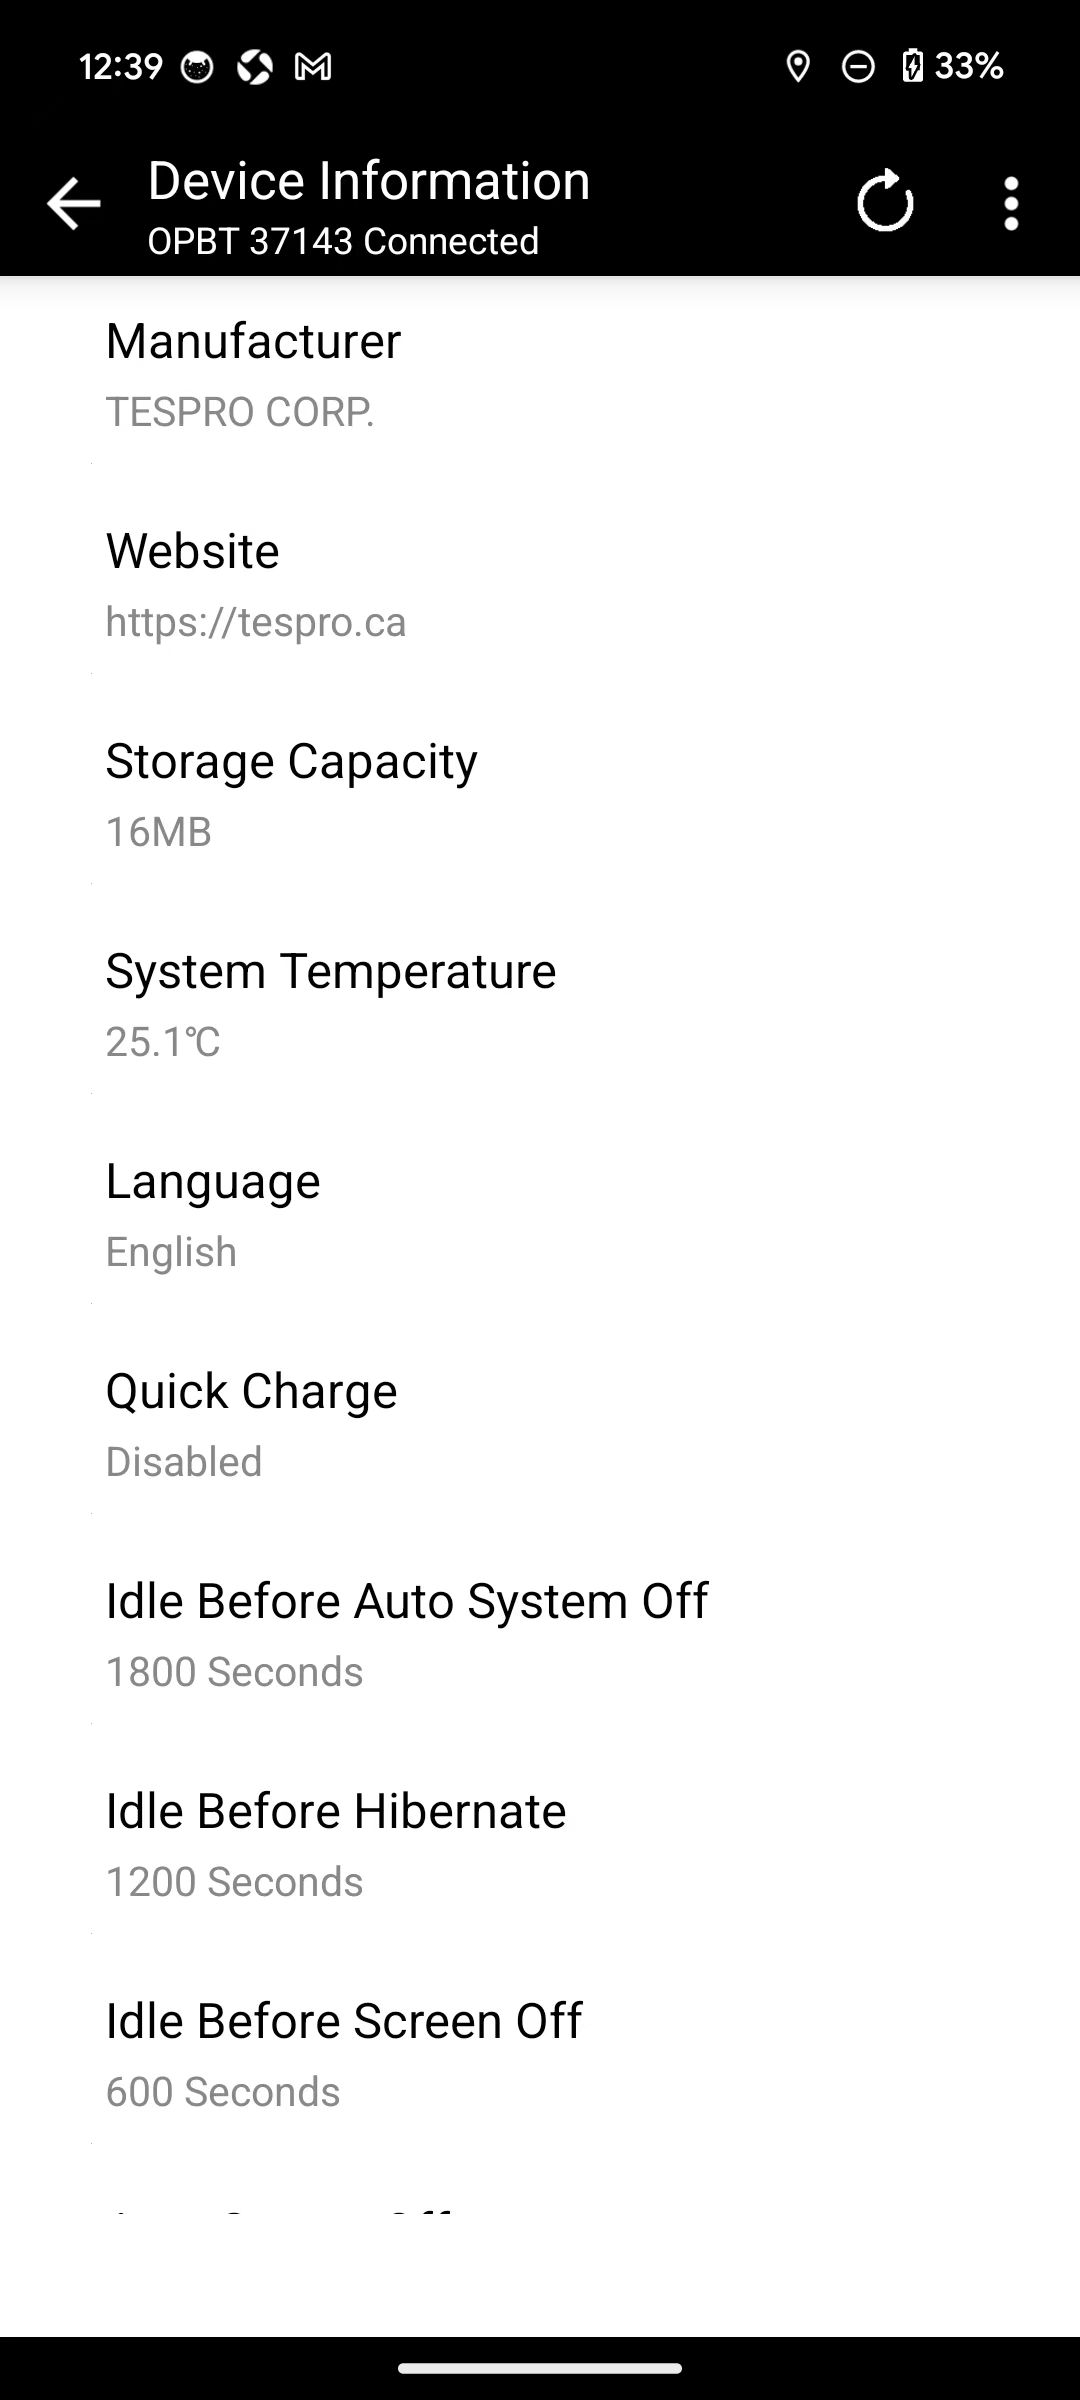
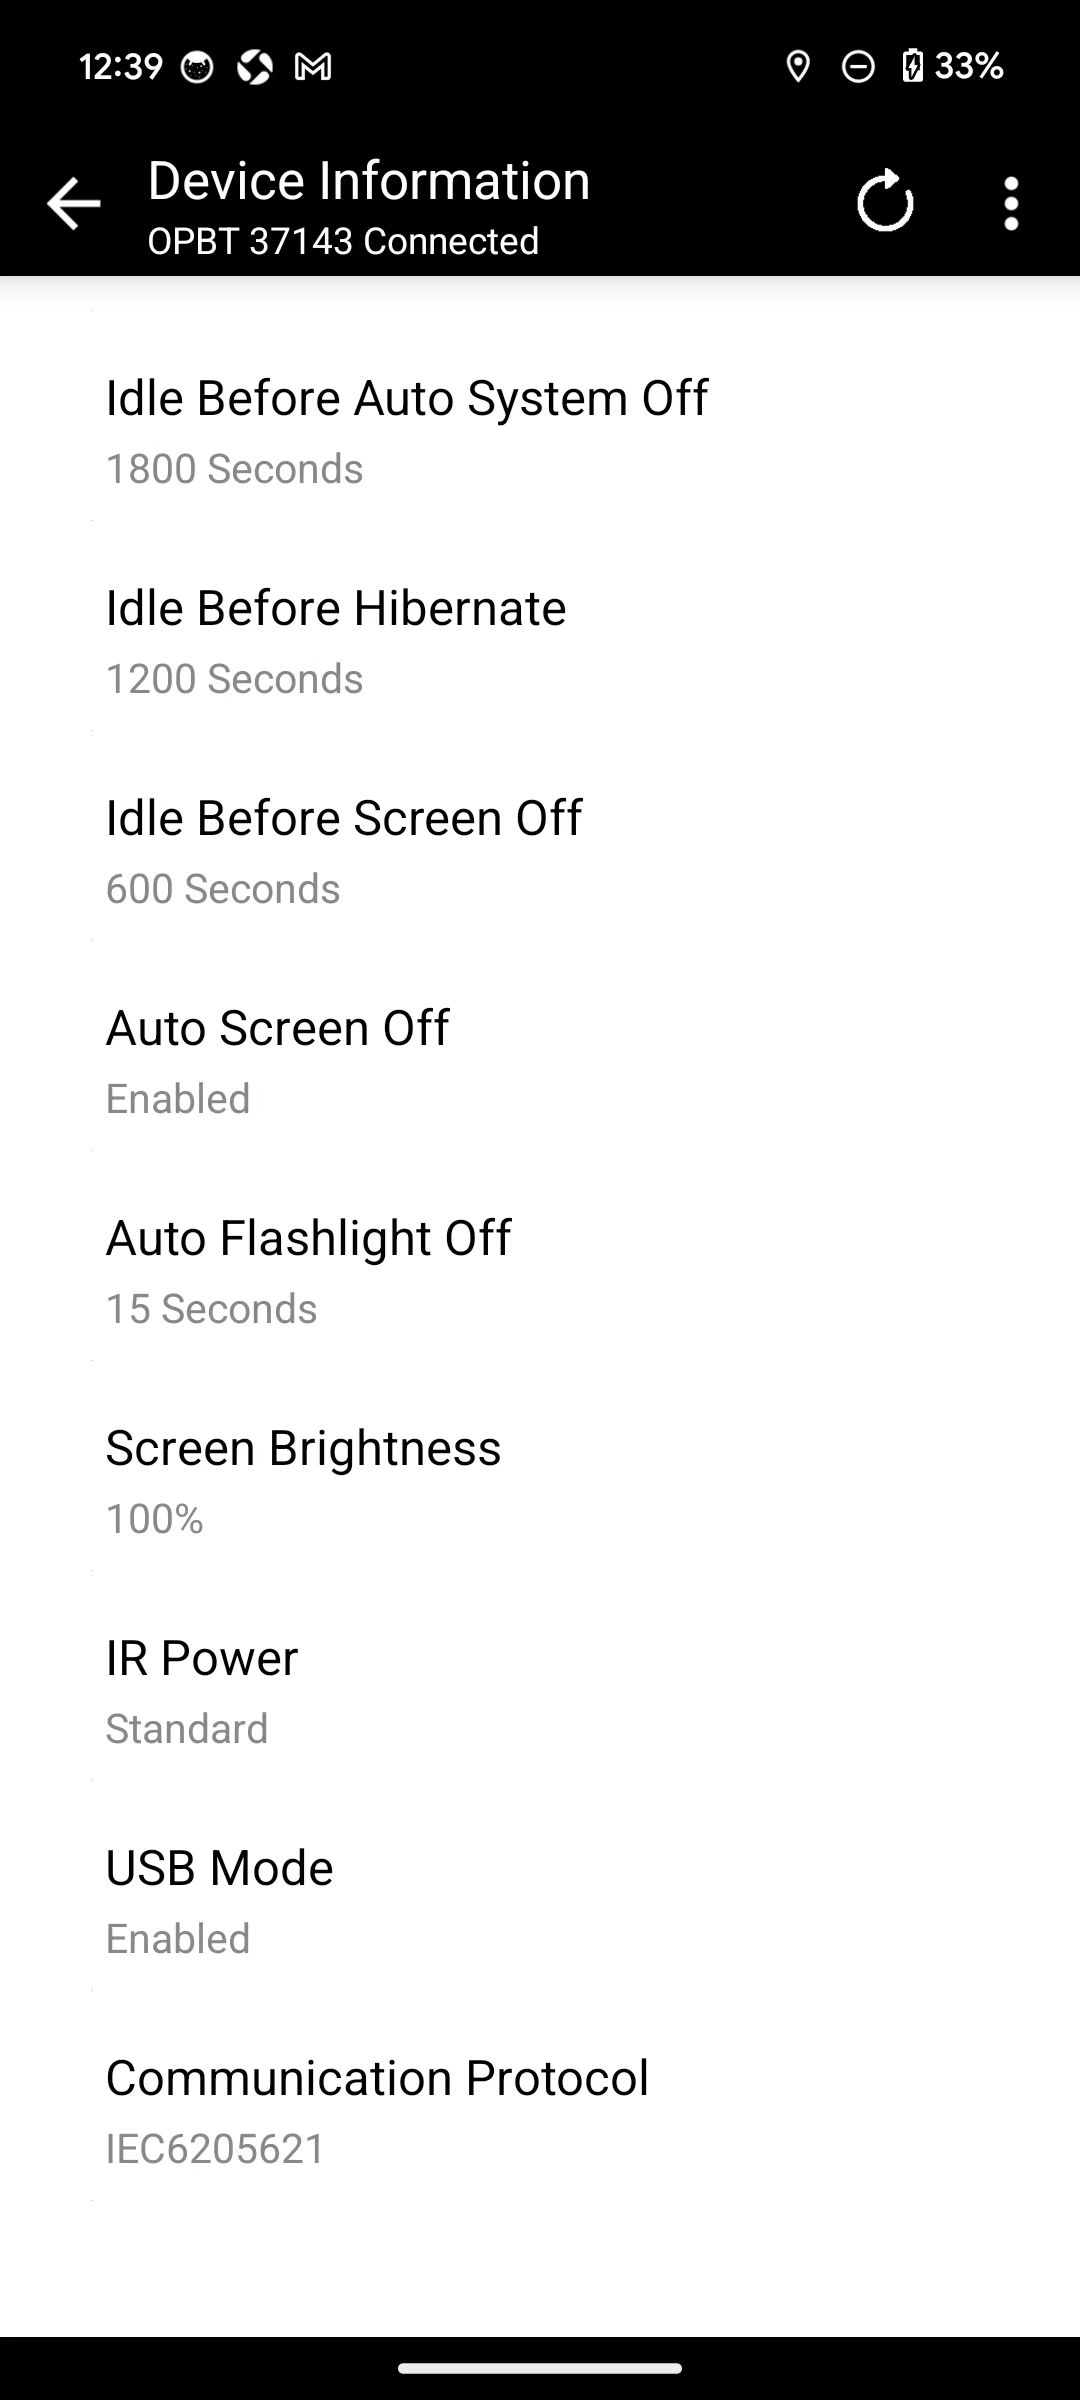
5.1 System information (read-only)
- Model
- Software version
- Hardware version
- Storage capacity
- Battery voltage (mV)
This version has no “System voltage” or “System temperature” fields.
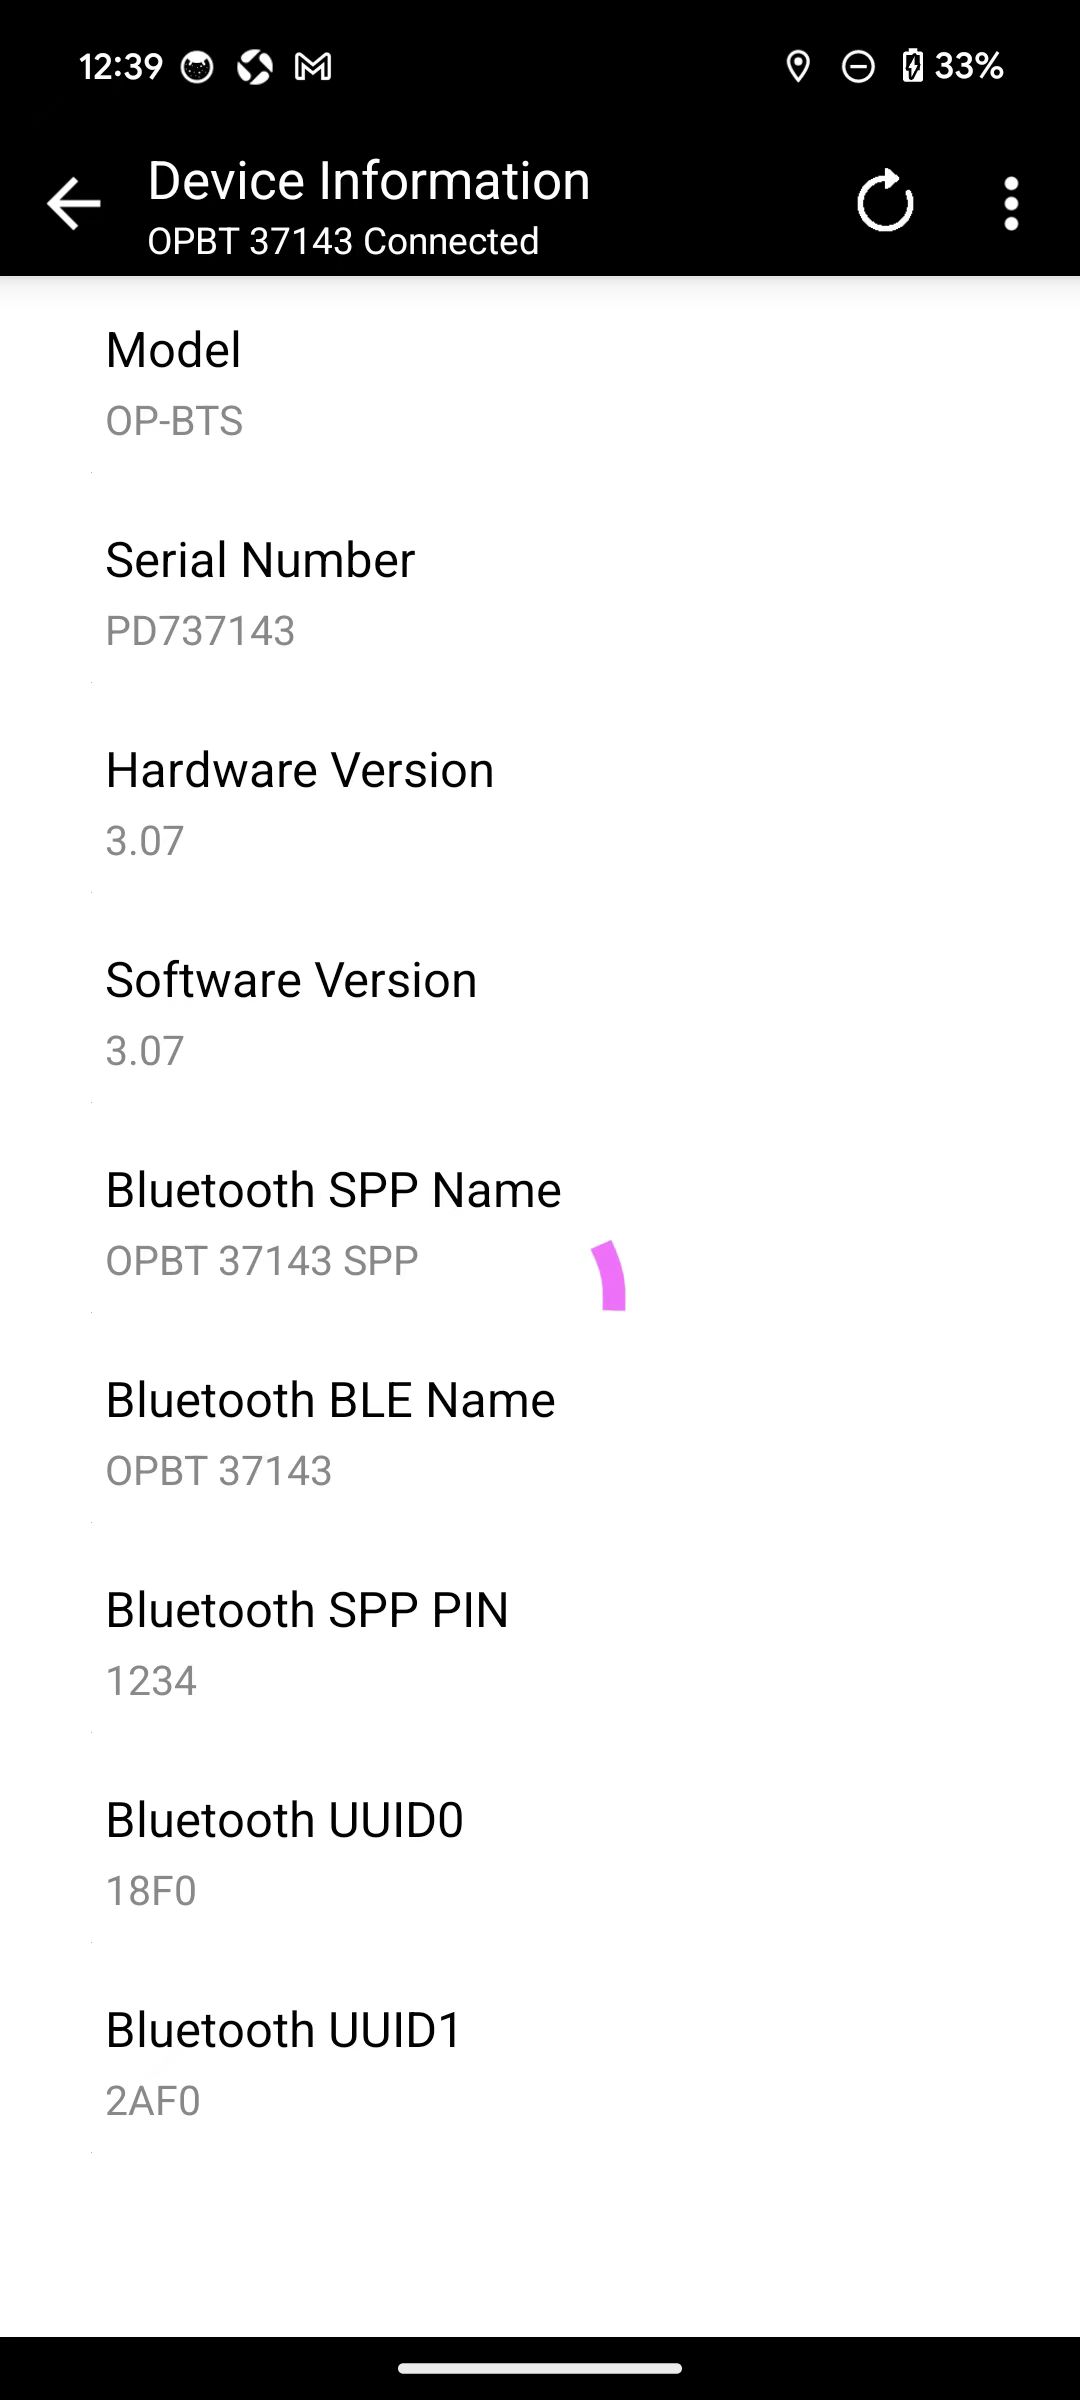
System information (example)
System information (continued)
System information (continued)
5.2 Advanced settings (two-level structure)
Advanced settings is roughly organized into three groups:
- Bluetooth settings, Reset device, Upgrade firmware
- Import more features (opens the import configuration page)
- Imported custom configuration list
Imported configurations appear only in Advanced settings group 3; there is no separate “Custom parameters” group on the device home.
Advanced settings
Advanced settings (continued)
6. Parameter editing and save behavior
Most parameter pages behave as follows.
6.1 Immediate effect (runtime)
After you change a value, confirm, or toggle a switch on a parameter page, the app writes the new value to the device’s current running configuration as soon as possible. When communication is healthy, behavior changes immediately (for example sleep time or brightness).
6.2 Persistent save (survives power-off)
Two common methods:
- Save icon at the top right of the parameter page
Appears when there are unsaved changes; tapping it writes the page’s related changes to device persistent storage. - Advanced settings → Reset device → Save configuration
Saves current system parameters as user-default related configuration (see §14).
If you only change parameters without saving via the methods above, power-cycling usually restores the last saved default configuration.
6.3 Exit confirmation and gesture back
When leaving a parameter page with unsaved changes, you are prompted: Device parameters have changed. Save?
Buttons are Don’t save / Save.
Using the system back key, swipe-back, or title-bar back also triggers this confirmation so accidental exits do not lose changes.
6.4 Recommendation
For settings you need long-term (communication parameters, default sleep time, etc.), tap the save icon after confirming, or run Save configuration under Reset device.
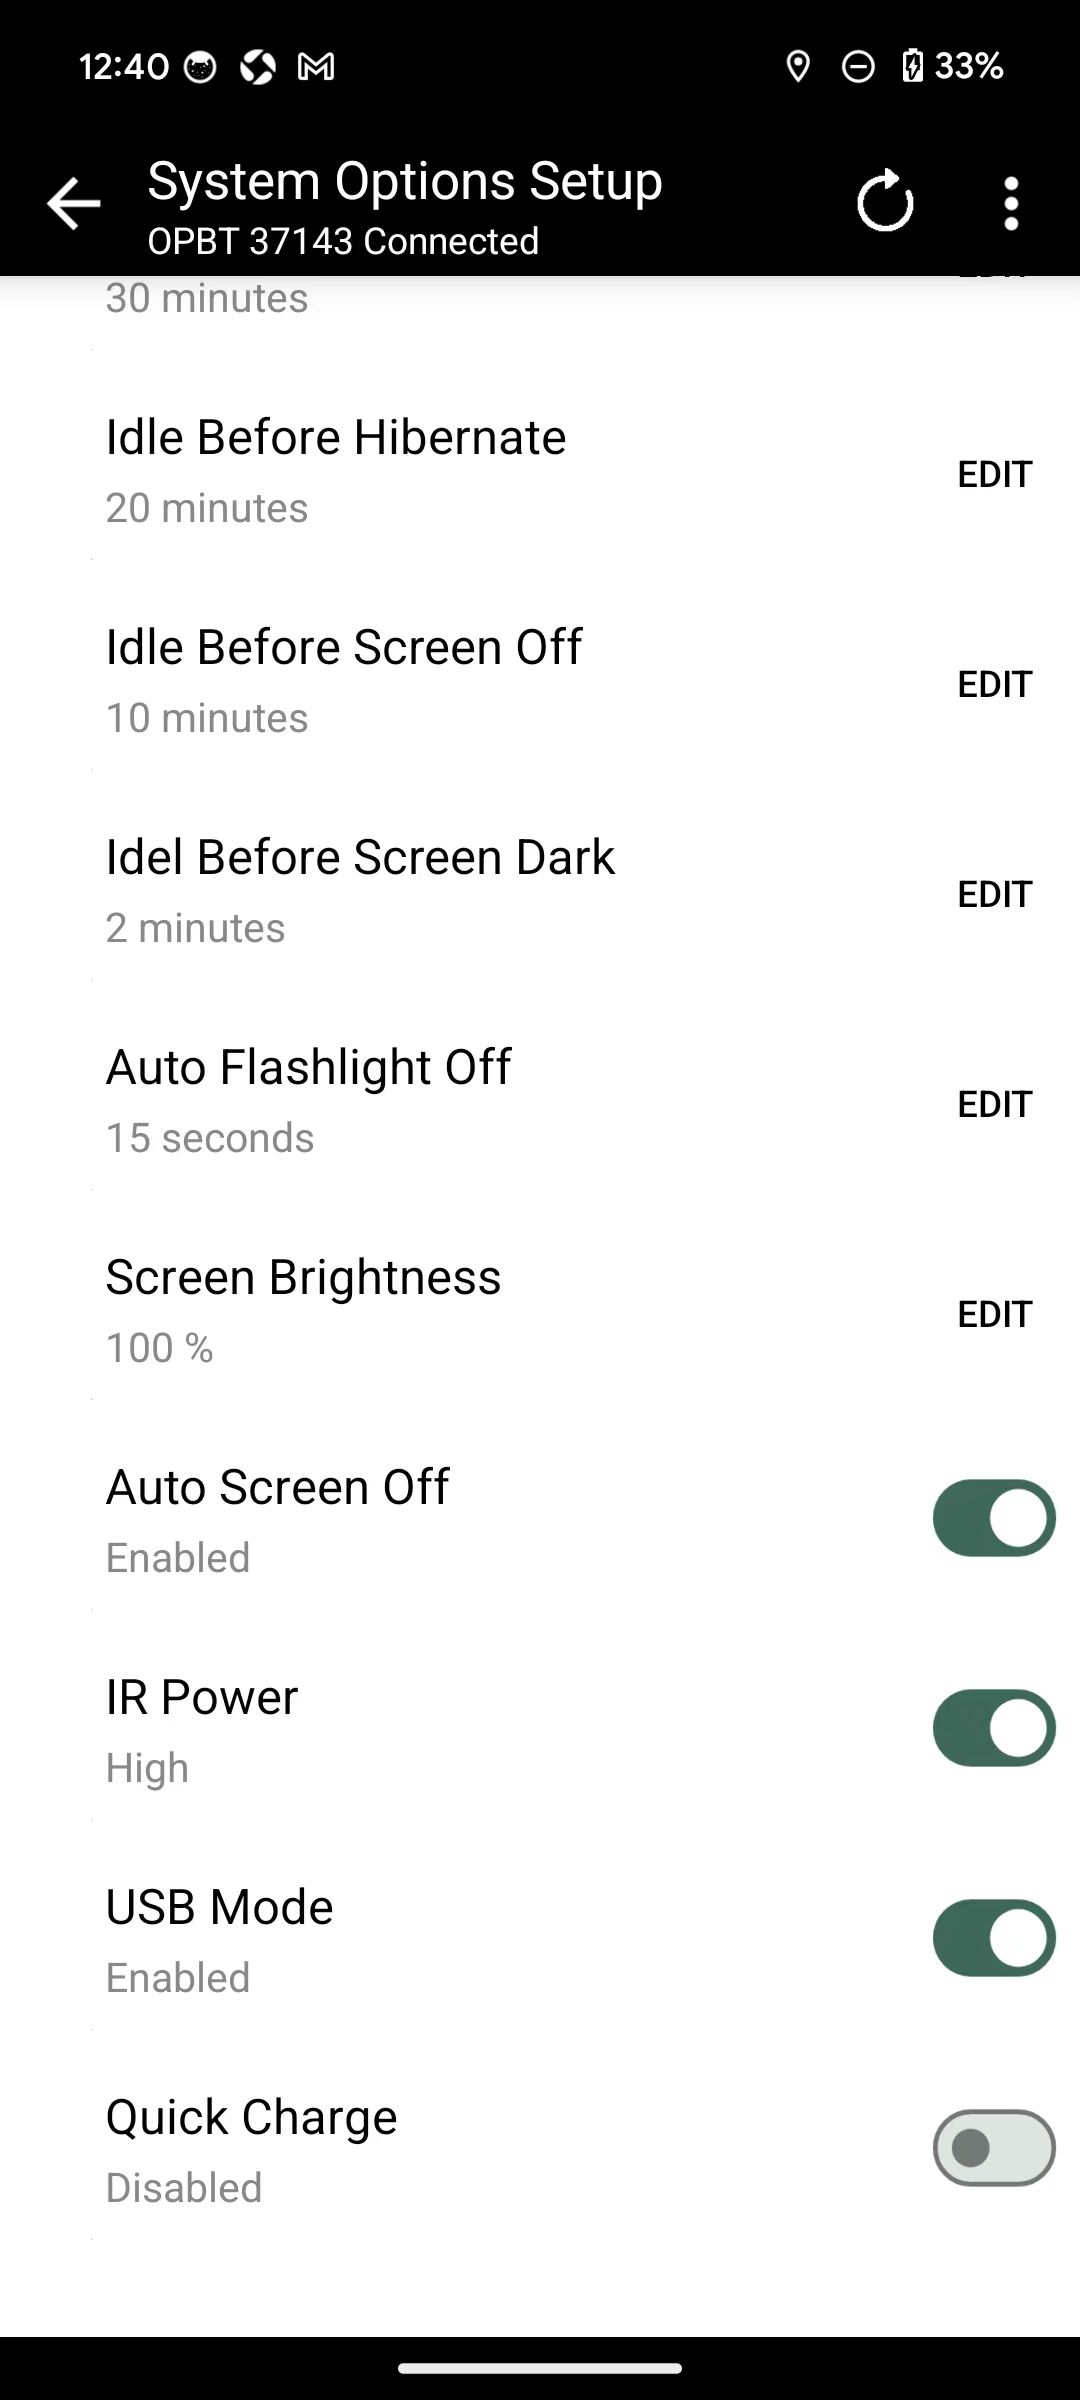
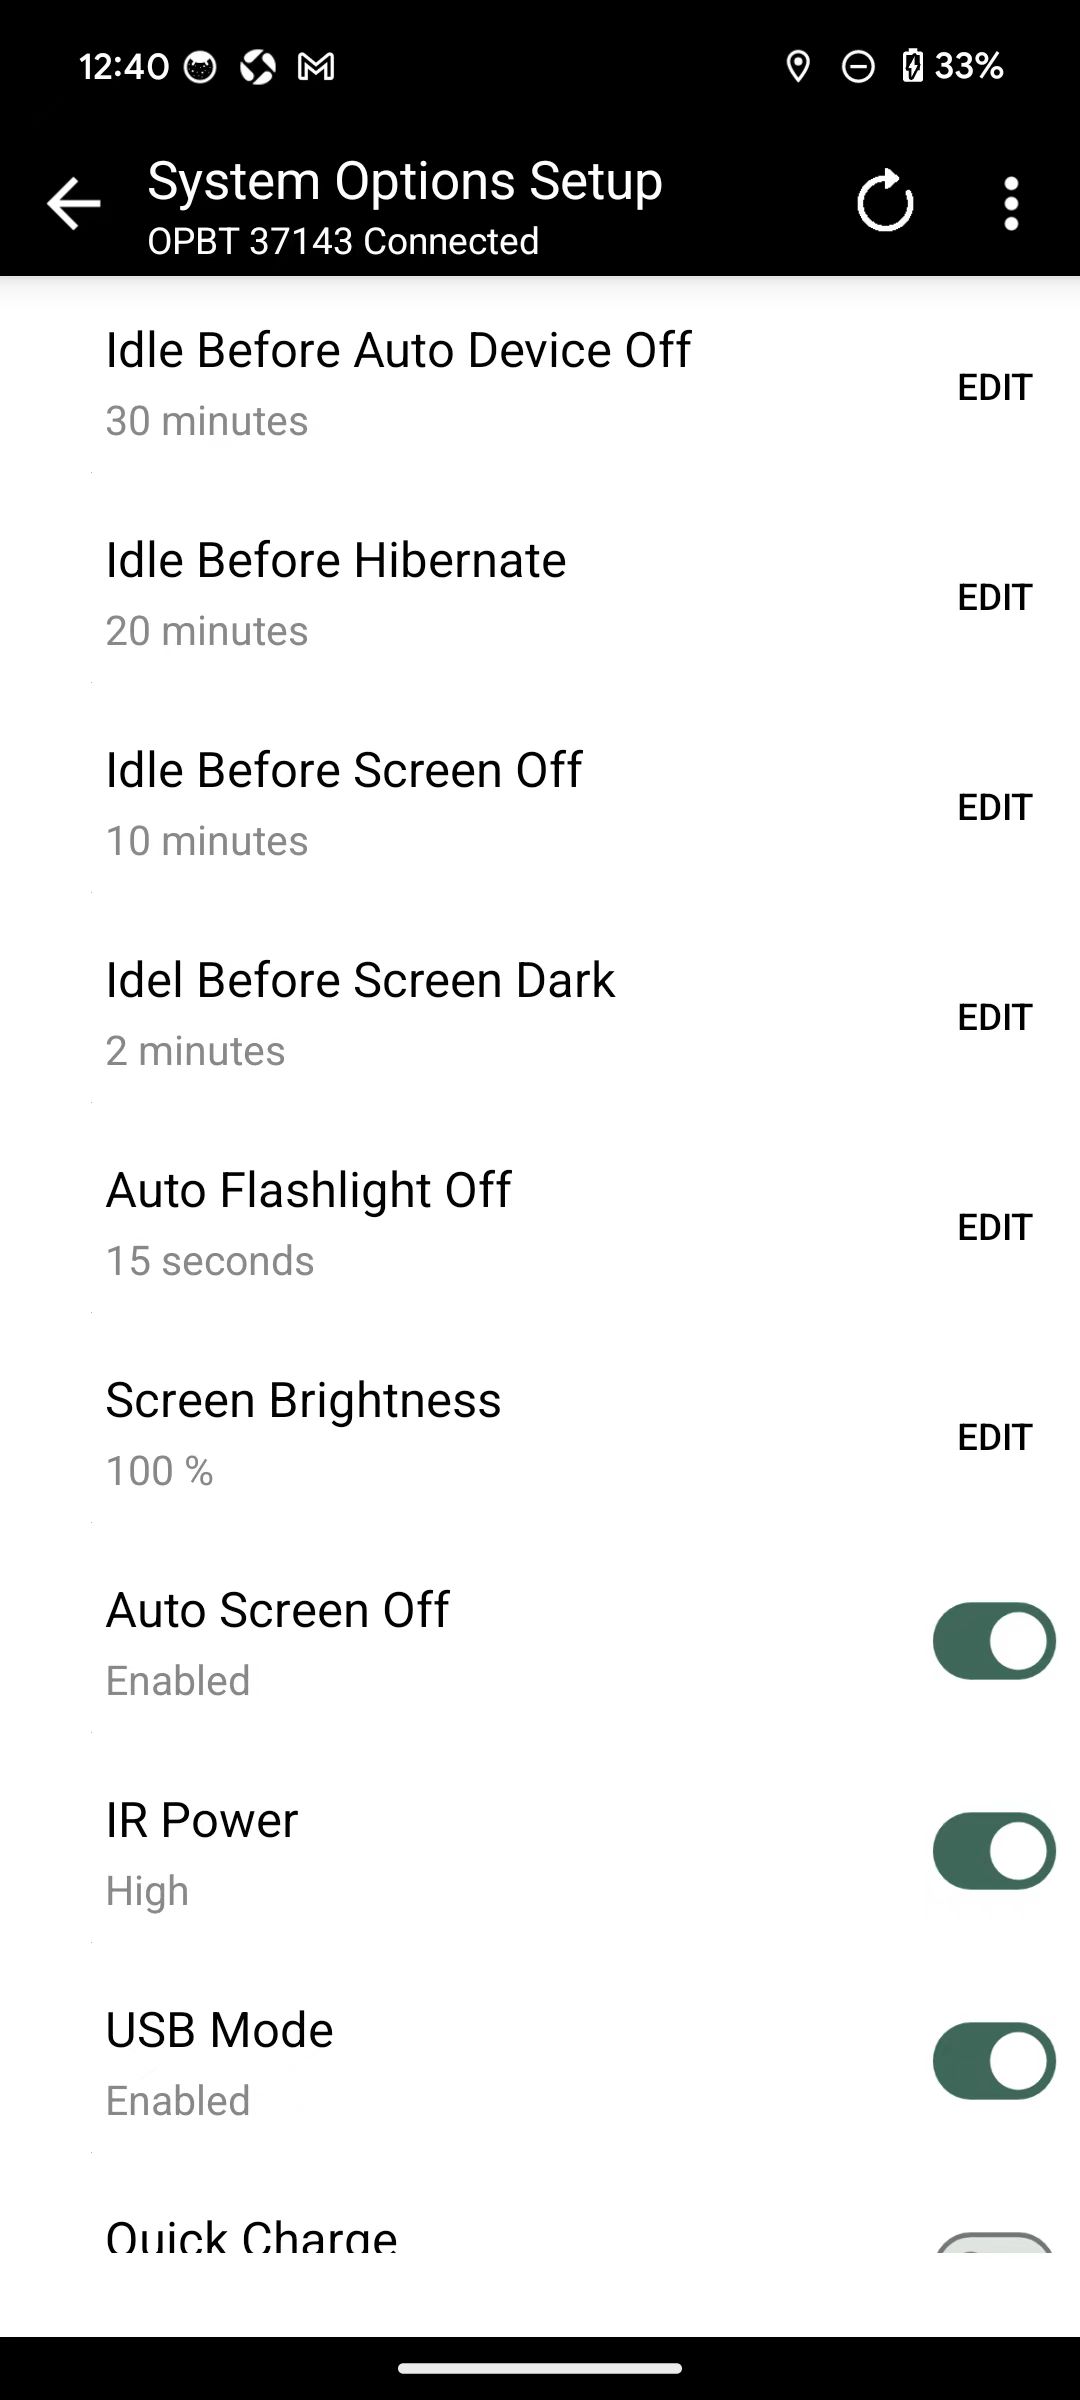
7. System settings
Entry: Device home → Settings (page title: System settings).
Configure device power, sleep, screen, flashlight, USB, and charging behavior. Typical items:
7.1 Power and sleep
- Auto power-off time
Powers off after idle. Options include Never, and 5 / 10 / 20 / 30 / 60 / 120 / 240 / 480 minutes, etc. - System sleep time
Enters sleep after idle. Options include Never sleep and several minute steps.
7.2 Screen
- Screen auto-off: switch style, UI shows Enable / Disable.
- Screen off time: time before the screen turns off with no activity.
- Screen dim time: time before brightness is reduced prior to screen-off.
- Screen brightness: 0–100%.
7.3 Flashlight and USB
- Flashlight auto-off time: common options 10 / 20 / 30 / 60 seconds, etc. (range about 0–120 seconds).
- USB communication mode (device parameter): whether to enable device-side USB serial–related capability; switch labels are Enable / Disable. This configures the device’s own USB communication behavior; it is not the desktop connection channel labeled Coming soon (see §4.2).
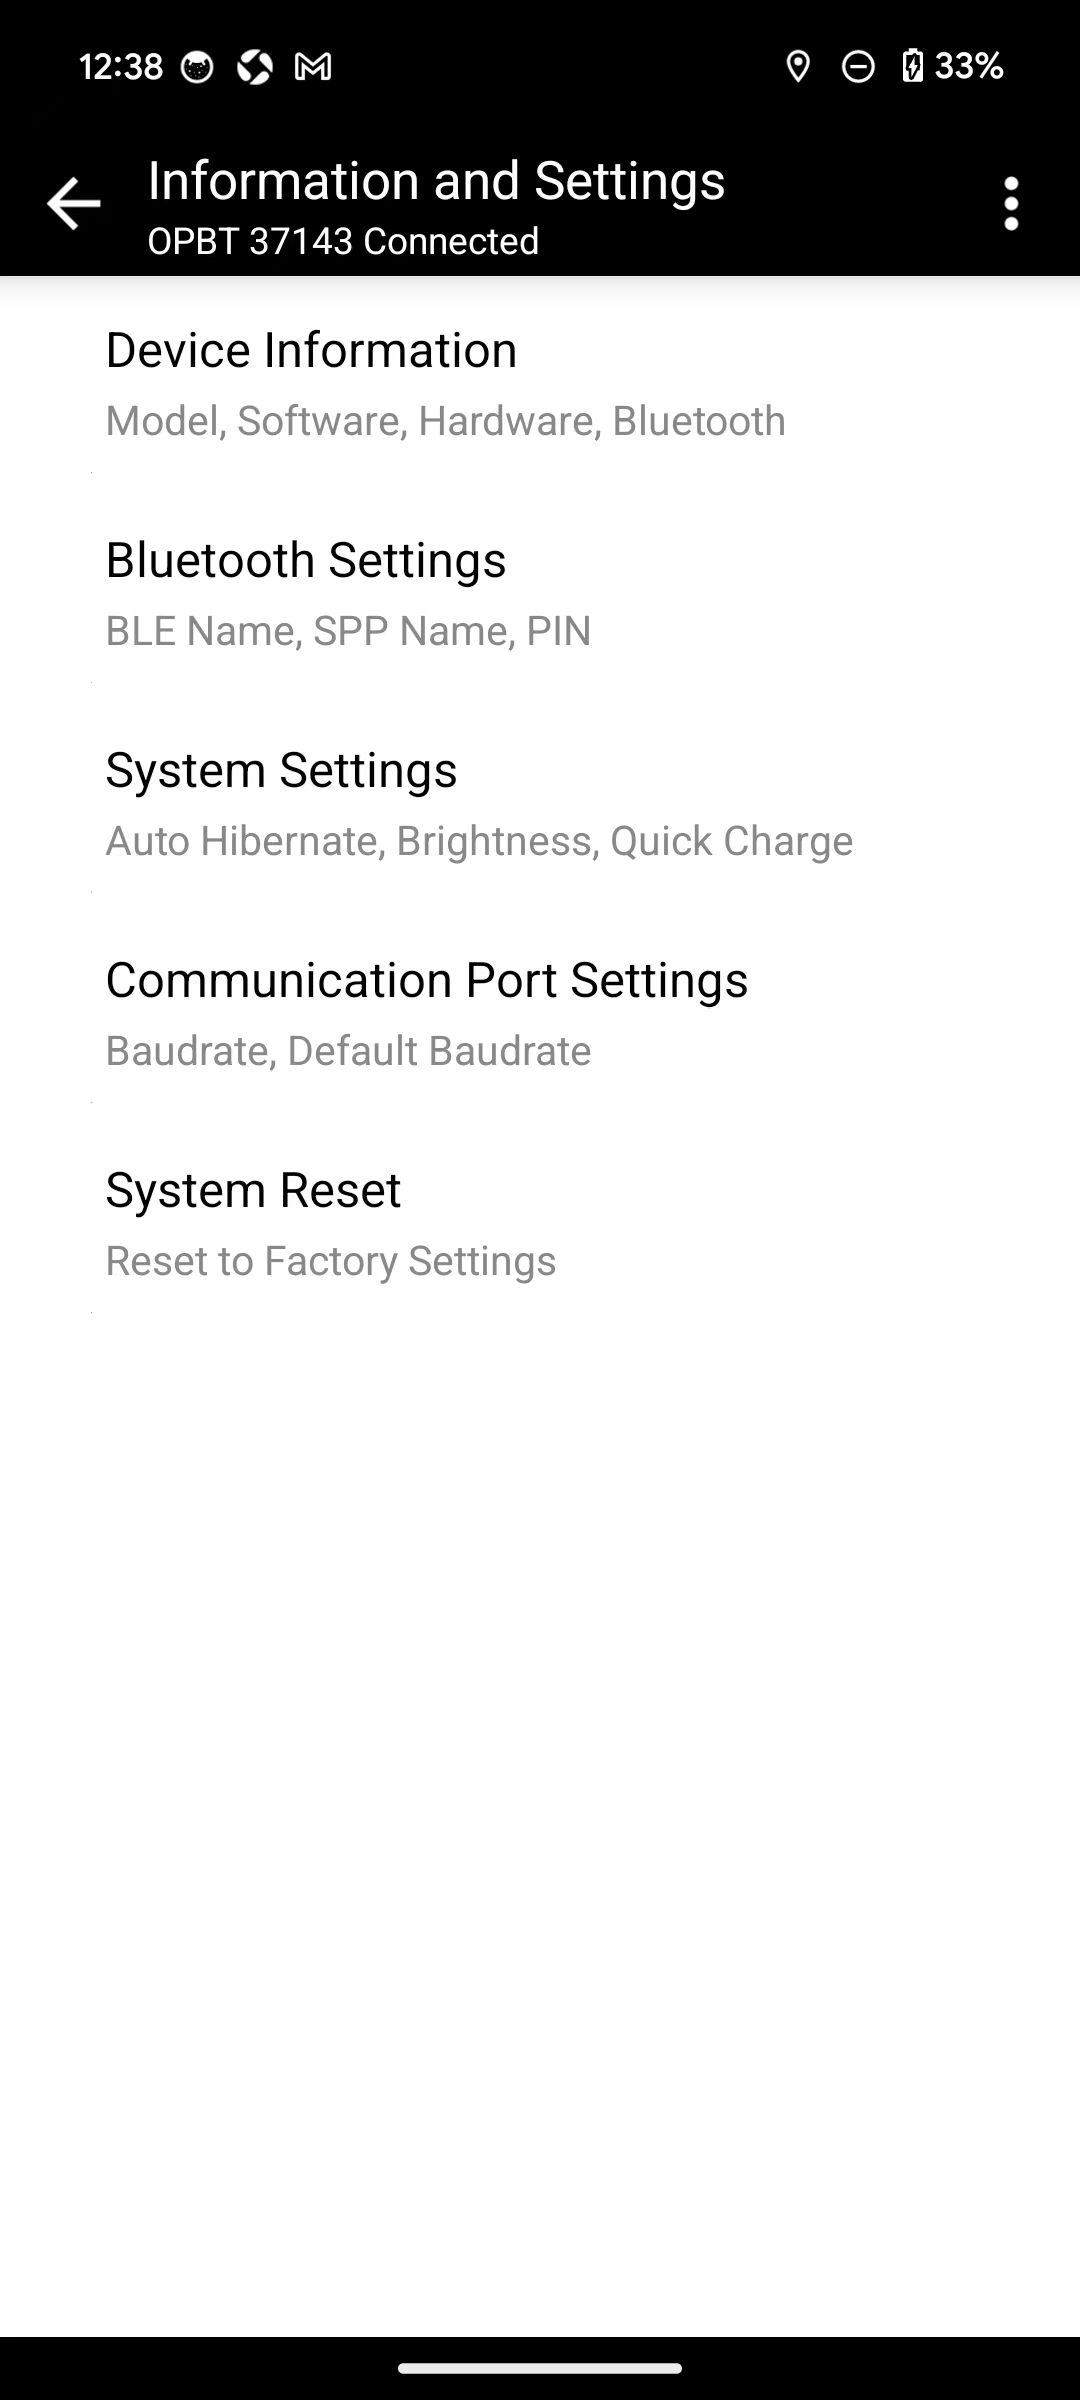
System settings
7.4 Charging
- Fast charging: choose between Fast charging and Normal charging.
After changes, save per §6 so they remain after reboot.
8. Bluetooth settings
Entry: Advanced settings → Bluetooth settings.
View or edit:
| Parameter | Description |
|---|---|
| SPP Bluetooth name | Default similar to ZENOVATE SPP; length limited by bytes (about ≤20 bytes) |
| BLE Bluetooth name | Default similar to ZENOVATE BLE |
| PIN code | Read-only |
| UUID0 / UUID1 / UUID2 | Read-only |
This version has no “Work mode” item. Do not look for that parameter from older manuals.
Important: After you finish changing writable Bluetooth name (and similar) settings, reboot the device for the changes to take effect. Save as prompted, then reboot and reconnect.
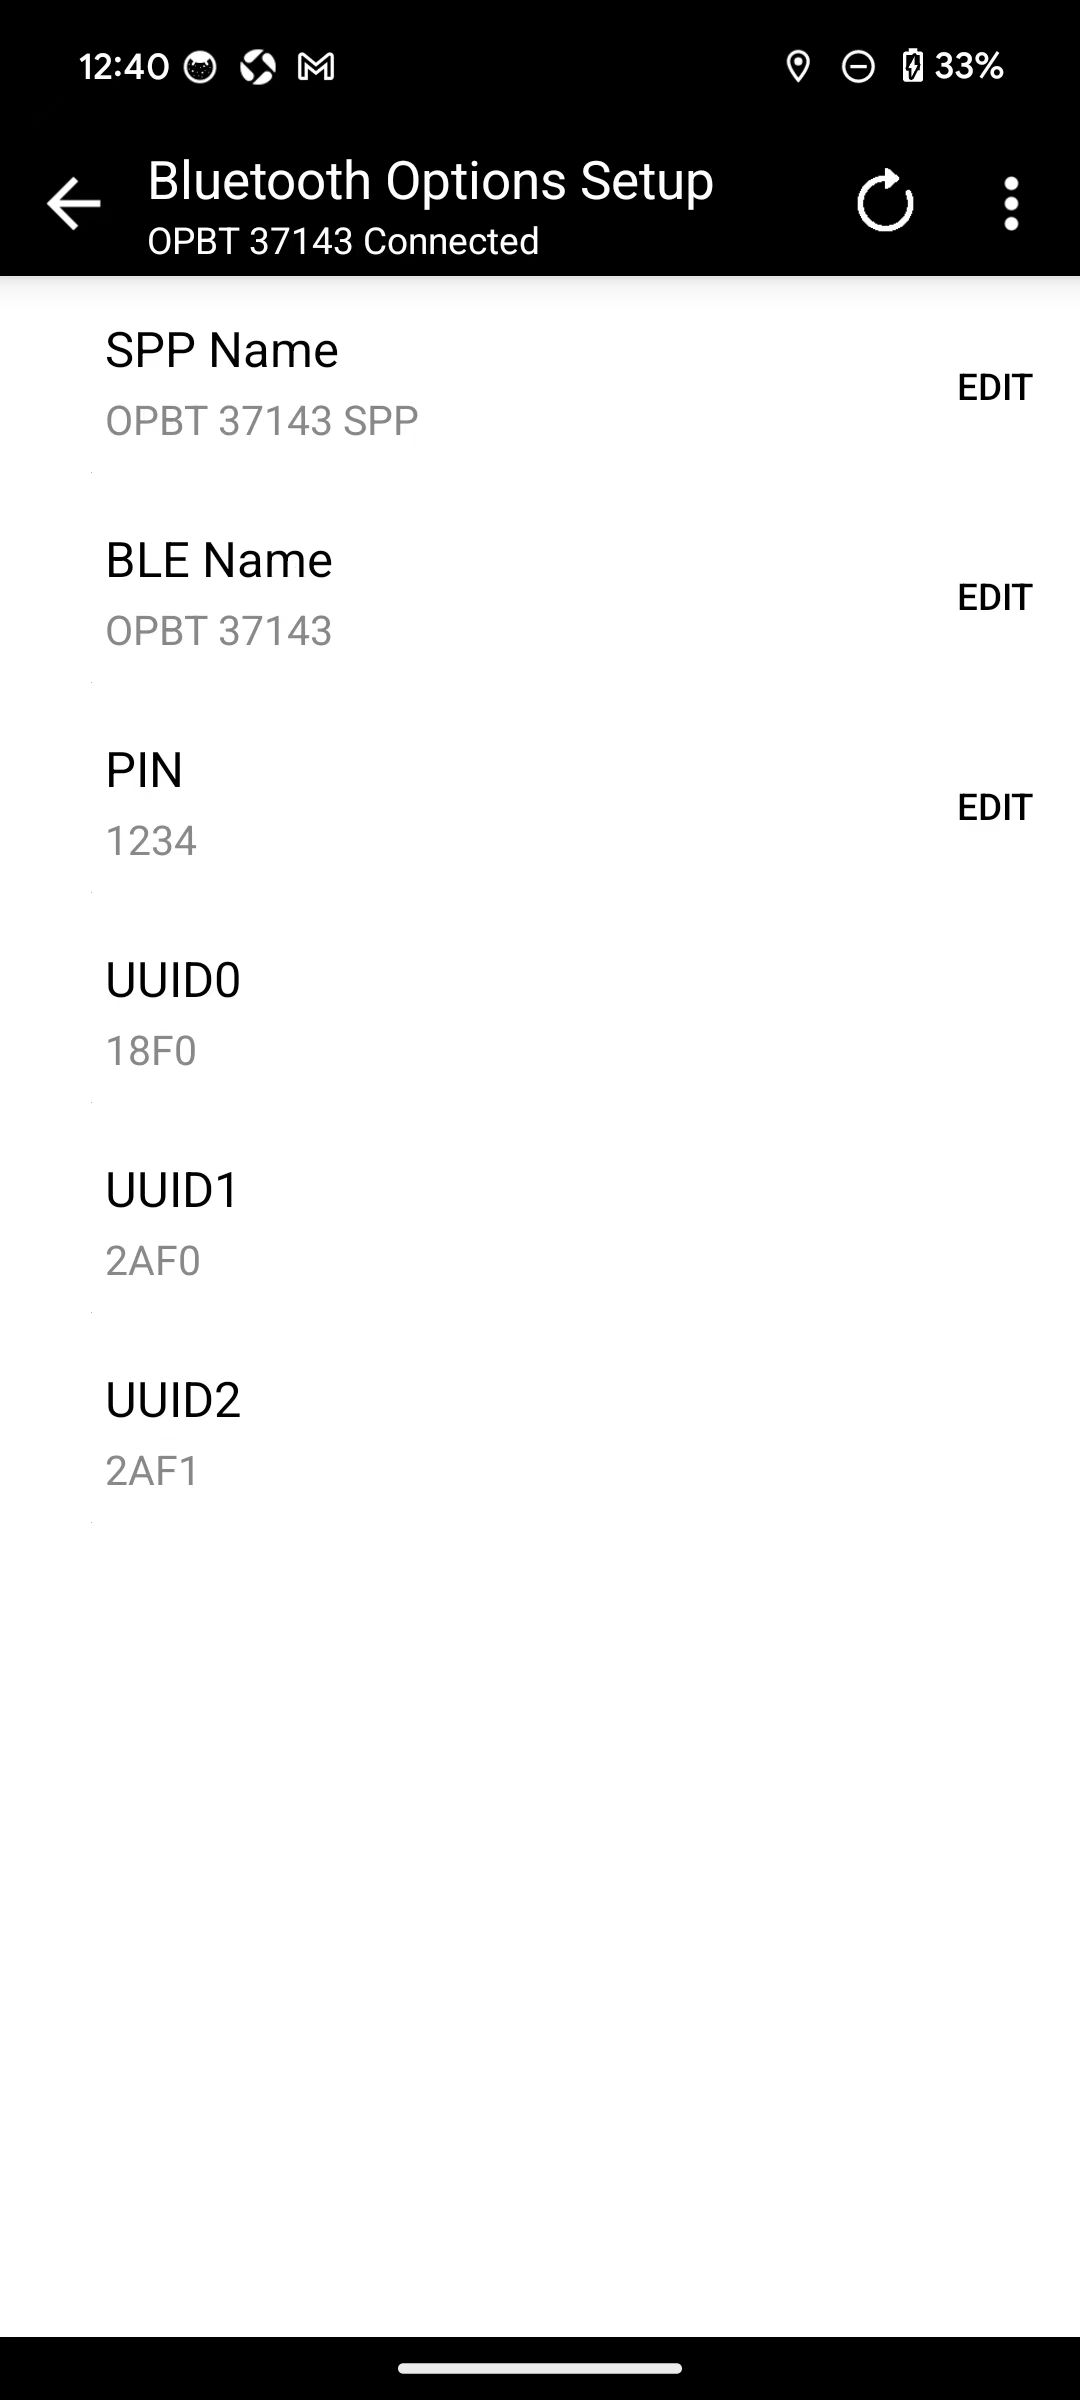
Bluetooth settings
9. Baud rate / communication parameters
Entry: Device home → Baud rate (or desktop “Baud rate settings”).
The page lists communication-port related items (e.g. “Baud rate settings 1..N”) with values such as: 115200, NONE, 8, 1.
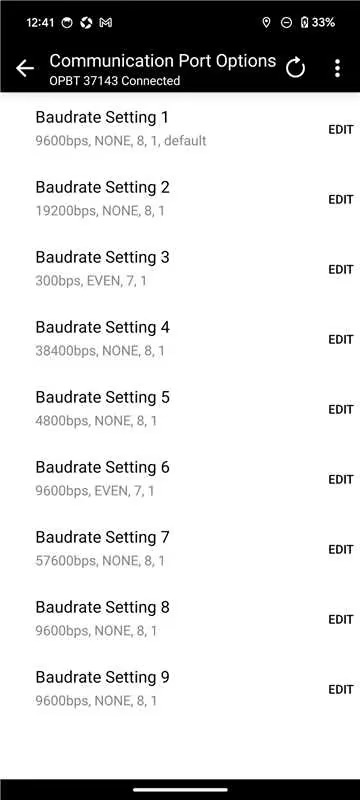
Baud rate settings list (mobile)

Screenshot pending: desktop baud rate settings
9.1 OP preset baud rate dialog
Opening the related edit entry shows the OP preset baud rate dialog:
- Multi-column dropdowns for preset combinations (commonly 4 columns)
- Default checkbox: whether to set the current combination as default
- Bottom OK / CANCEL
Confirming writes the running configuration; for long-term retention, save per §6.
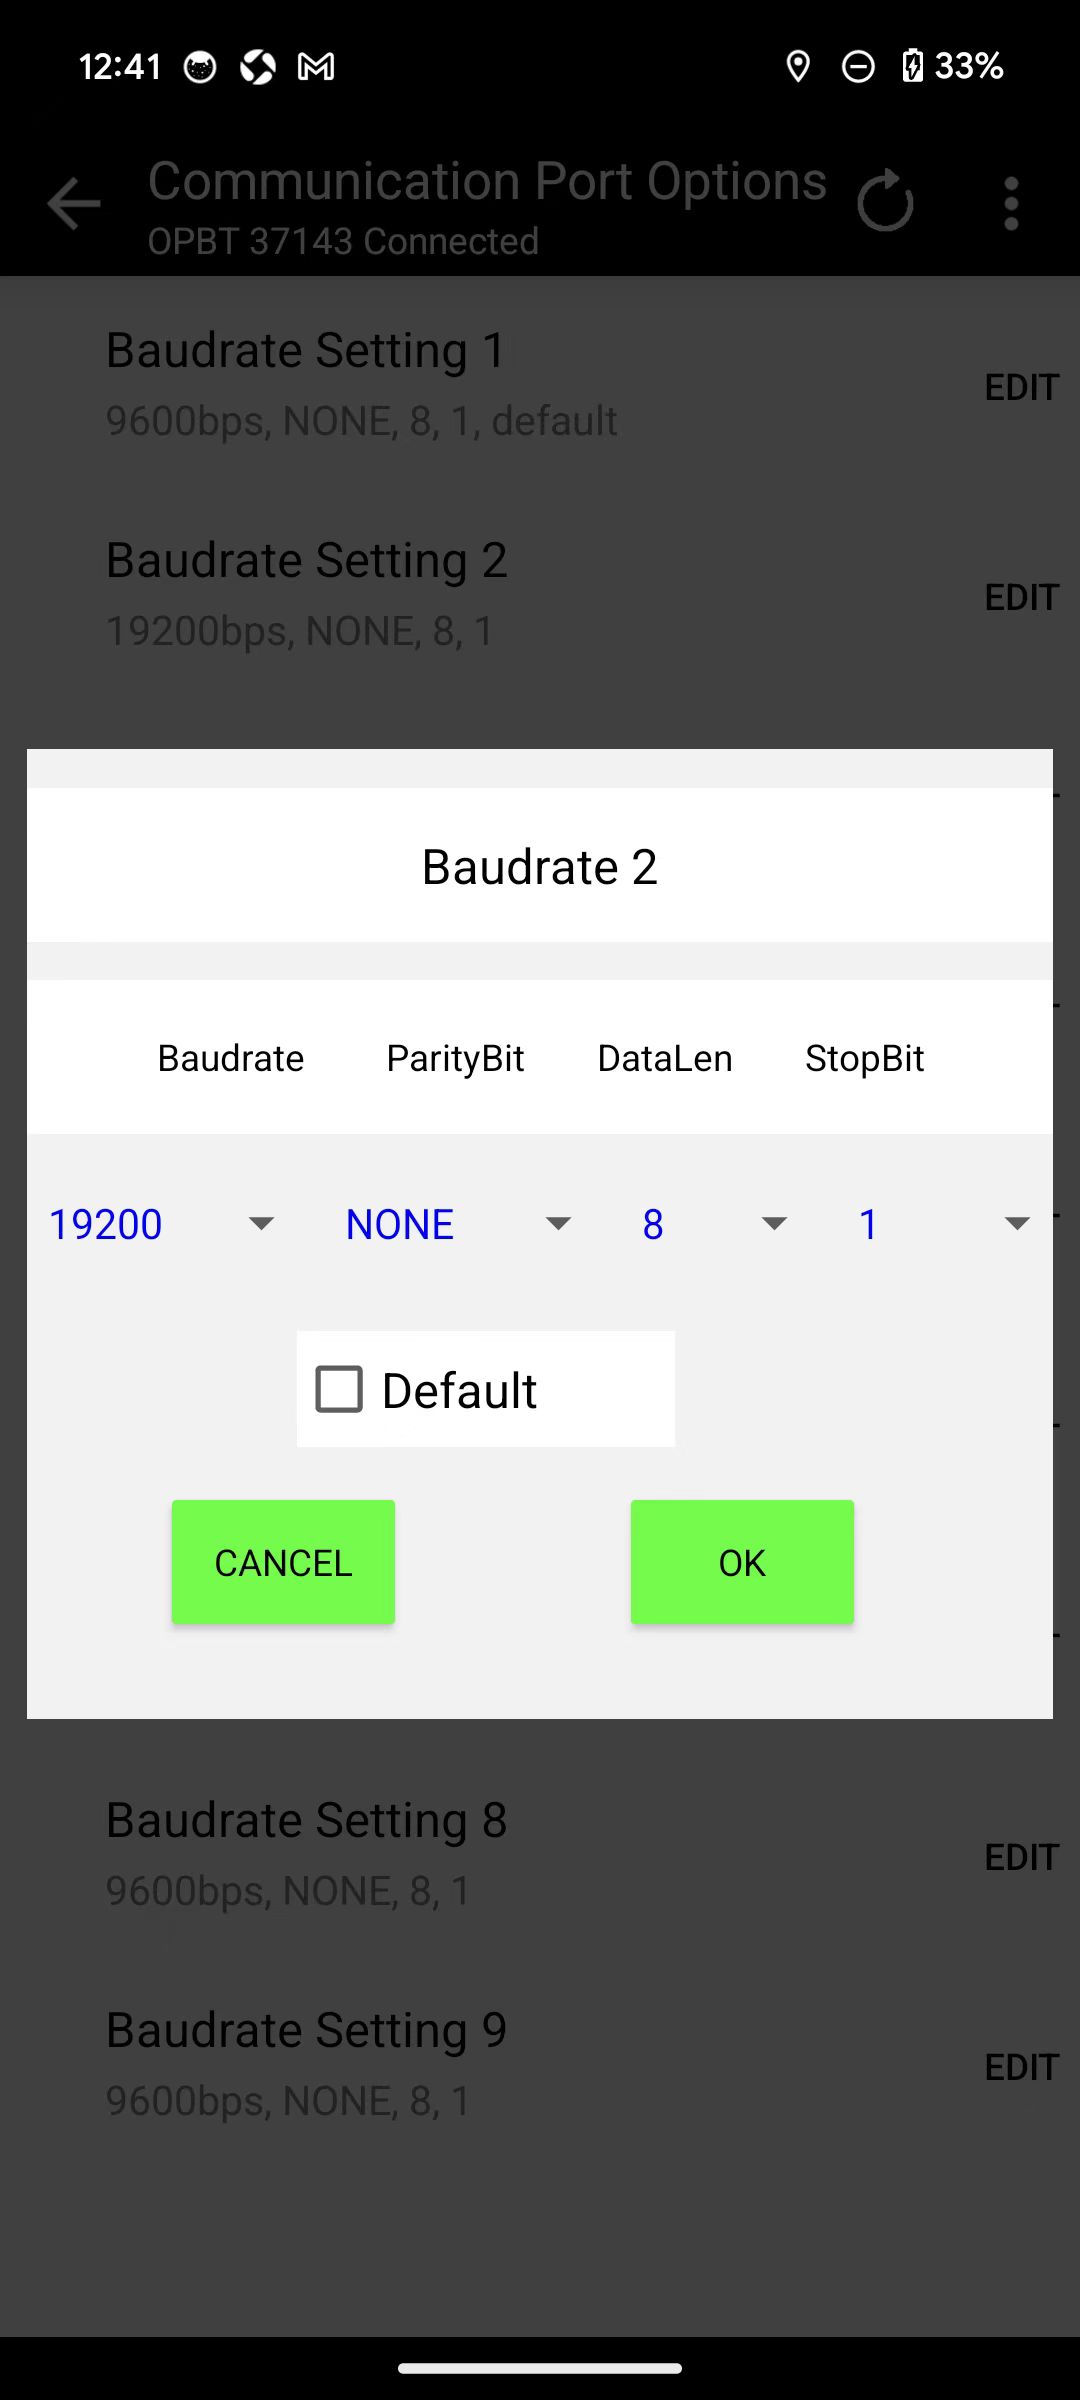
OP preset baud rate dialog
10. Configuration management
In the app, configuration management maps to the Import configuration page. Step-by-step screenshots and a walkthrough are also available: How to import configuration.
10.1 Entry
- Open the device home (connection is required to apply imported results to the device; the import page itself may open while disconnected).
- Advanced settings → Import more features.
- Desktop path is the same: Advanced settings → Import more features.

Screenshot pending: configuration import (local / remote) UI
10.2 Import from a local file
- Tap Import from file.
- Choose a
.jsonor.datconfiguration file (or similar). - On success, a message similar to “Configuration imported from file successfully” appears and the item shows in the imported list; failures may report parse or decrypt errors.
10.3 Import from remote
- Ensure the host is online.
- In URL or file name, enter:
- A full URL; or
- A file name only (imports the matching configuration from the official website)
- Enter the password provided by your vendor.
- Tap Import configuration from remote.
Common messages:
- Incorrect password
- Download failed
- Failed to decrypt the file. The file may use an unsupported encryption method.
10.4 Imported list
- The list shows saved custom configuration names; you can delete (with confirmation).
- If a newly imported configuration shares the same internal English name as an existing item, it overwrites the local configuration with that name.
- To use one: return to Advanced settings and tap the configuration name in group 3 to edit (see §5.2).
10.5 Custom parameter file tool
Used to generate encrypted .dat or plain .json from a plain configuration (parameter file encryption page):
- Select a source configuration file.
- Check the groups / parameters you need; group names can be edited per language (supports the app’s 7 language fields).
- Use the ⋮ menu: expand / collapse, select all, output format (grouped or flat), whether to Enable encryption (on by default), etc.
- Tap Generate, then save
.dator.jsonin the system Save As dialog.
Common entry points: Advanced settings areas, lists related to the import configuration page, and desktop configuration management pages.
11. File management
Entry: Device home → Files. Default remote path is /py.

Screenshot pending: file manager UI
11.1 UI and actions
- Bottom bar: upload file, delete, download selected (N); Cancel while a read is in progress.
- AppBar: new folder, refresh, settings, etc.
- Item menu (long-press or tap): download, delete, rename, run (
.py), refresh, select all, deselect all.
Multi-select supports batch download / delete.
11.2 Uploading Python files
When uploading .py, you can choose:
- Upload directly
- Compile then upload (compiled via PikaPython to
.py.o; failure shows “Python compile failed”)
11.3 File name limits
If a file name contains non-English characters and is longer than 20 characters, upload is blocked. The original message is:
文件名包含非英文字符且长度超过20个字符,不允许上传
Pure English names, or names no longer than 20 characters, are not blocked by this rule.
11.4 Running scripts
Choosing Run on a .py file prompts that the run command was sent (e.g. “Run command sent”); observe execution results on the device.
11.5 Download directory
- Mobile: default directory is about
/storage/emulated/0/Download/op-manager; same-name files ask whether to overwrite (“Overwrite file” / “A file with the same name exists. Overwrite?”). - Desktop: set the download directory in app settings; the first download may prompt for a folder; the page bottom shows Download save to and an open-folder entry.
12. Firmware upgrade
Step-by-step walkthrough with screenshots: How to upgrade firmware.
Entry: Advanced settings → Upgrade firmware (requires a usable Bluetooth or other link).
Both mobile and desktop support online firmware download (network required) and selecting a local .fw file.

Screenshot pending: firmware upgrade UI
12.1 Guide page: Bluetooth upgrade mode
Title: Bluetooth upgrade mode. Before upgrading, put the device into Bluetooth upgrade mode:
Step 1: Enter upgrade mode
With the device powered off, press the power key, then within 1 second quickly press the reset key or menu key.
Step 2: Confirm red LEDs are blinking
Two red LEDs blinking = Bluetooth upgrade mode (target state).
If you see green LEDs blinking
Two green LEDs blinking = infrared upgrade mode. Press the reset / menu key to switch to red-LED mode.
Before continuing
- Ensure the battery has enough charge.
- Do not power off during the upgrade.
When ready, tap I have completed the steps above, continue.
12.2 Connection method differences
- Serial (and a future available desktop USB connection channel): can reuse the current connection without disconnecting and go straight to the upgrade page.
- BLE: disconnects the current session and opens a firmware-upgrade-only scan list; prompt: Select a device in upgrade mode and connect via Bluetooth.
12.3 Select firmware and upgrade
- Choose model OPBT583 or OPBT585 (may auto-select if hardware version was read during the guide stage).
- Source:
- Online latest (default): downloads the matching zip from the website (e.g. latest packages for OPBT583B / OPBT585), auto-extracts
.fw, and shows download / extract progress. - Local file: select a
.fwonly.
- Online latest (default): downloads the matching zip from the website (e.g. latest packages for OPBT583B / OPBT585), auto-extracts
- Tap Start upgrade.
- During upgrade you can view scrolling IAP logs and copy them; desktop also shows four progress steps: Read → Erase → Write → Verify.
- On finish, SnackBar: Firmware upgrade completed. or Firmware upgrade failed.; the page does not auto-navigate—you can retry in place.
The app does not show an extra battery-check dialog before starting; follow the guide page about charge and uninterrupted power.
13. Languages
OP Manager supports 7 UI languages:
- English
- 中文
- Español
- Français
- Deutsch
- 日本語
- العربية
13.1 How to switch
- Mobile: use the top-bar language button. Prompt similar to Language changed. Please restart the app. — restart for it to take effect.
- Desktop: switch language in the app settings dialog (§4.3); takes effect immediately, no restart.
Parameter names, most prompts, and some configuration group-name fields follow the language switch.
14. System reset
Entry: Advanced settings → Reset device.
Currently only two items (no “System reboot” menu item):
- Save configuration
Saves current parameters as user-restorable configuration / default-related data. - Restore user factory settings
Restores user factory defaults; back up needed configurations first. Read the in-app confirmation carefully.
Restore-type operations often need Save configuration plus a device power cycle to fully apply; follow in-app prompts.
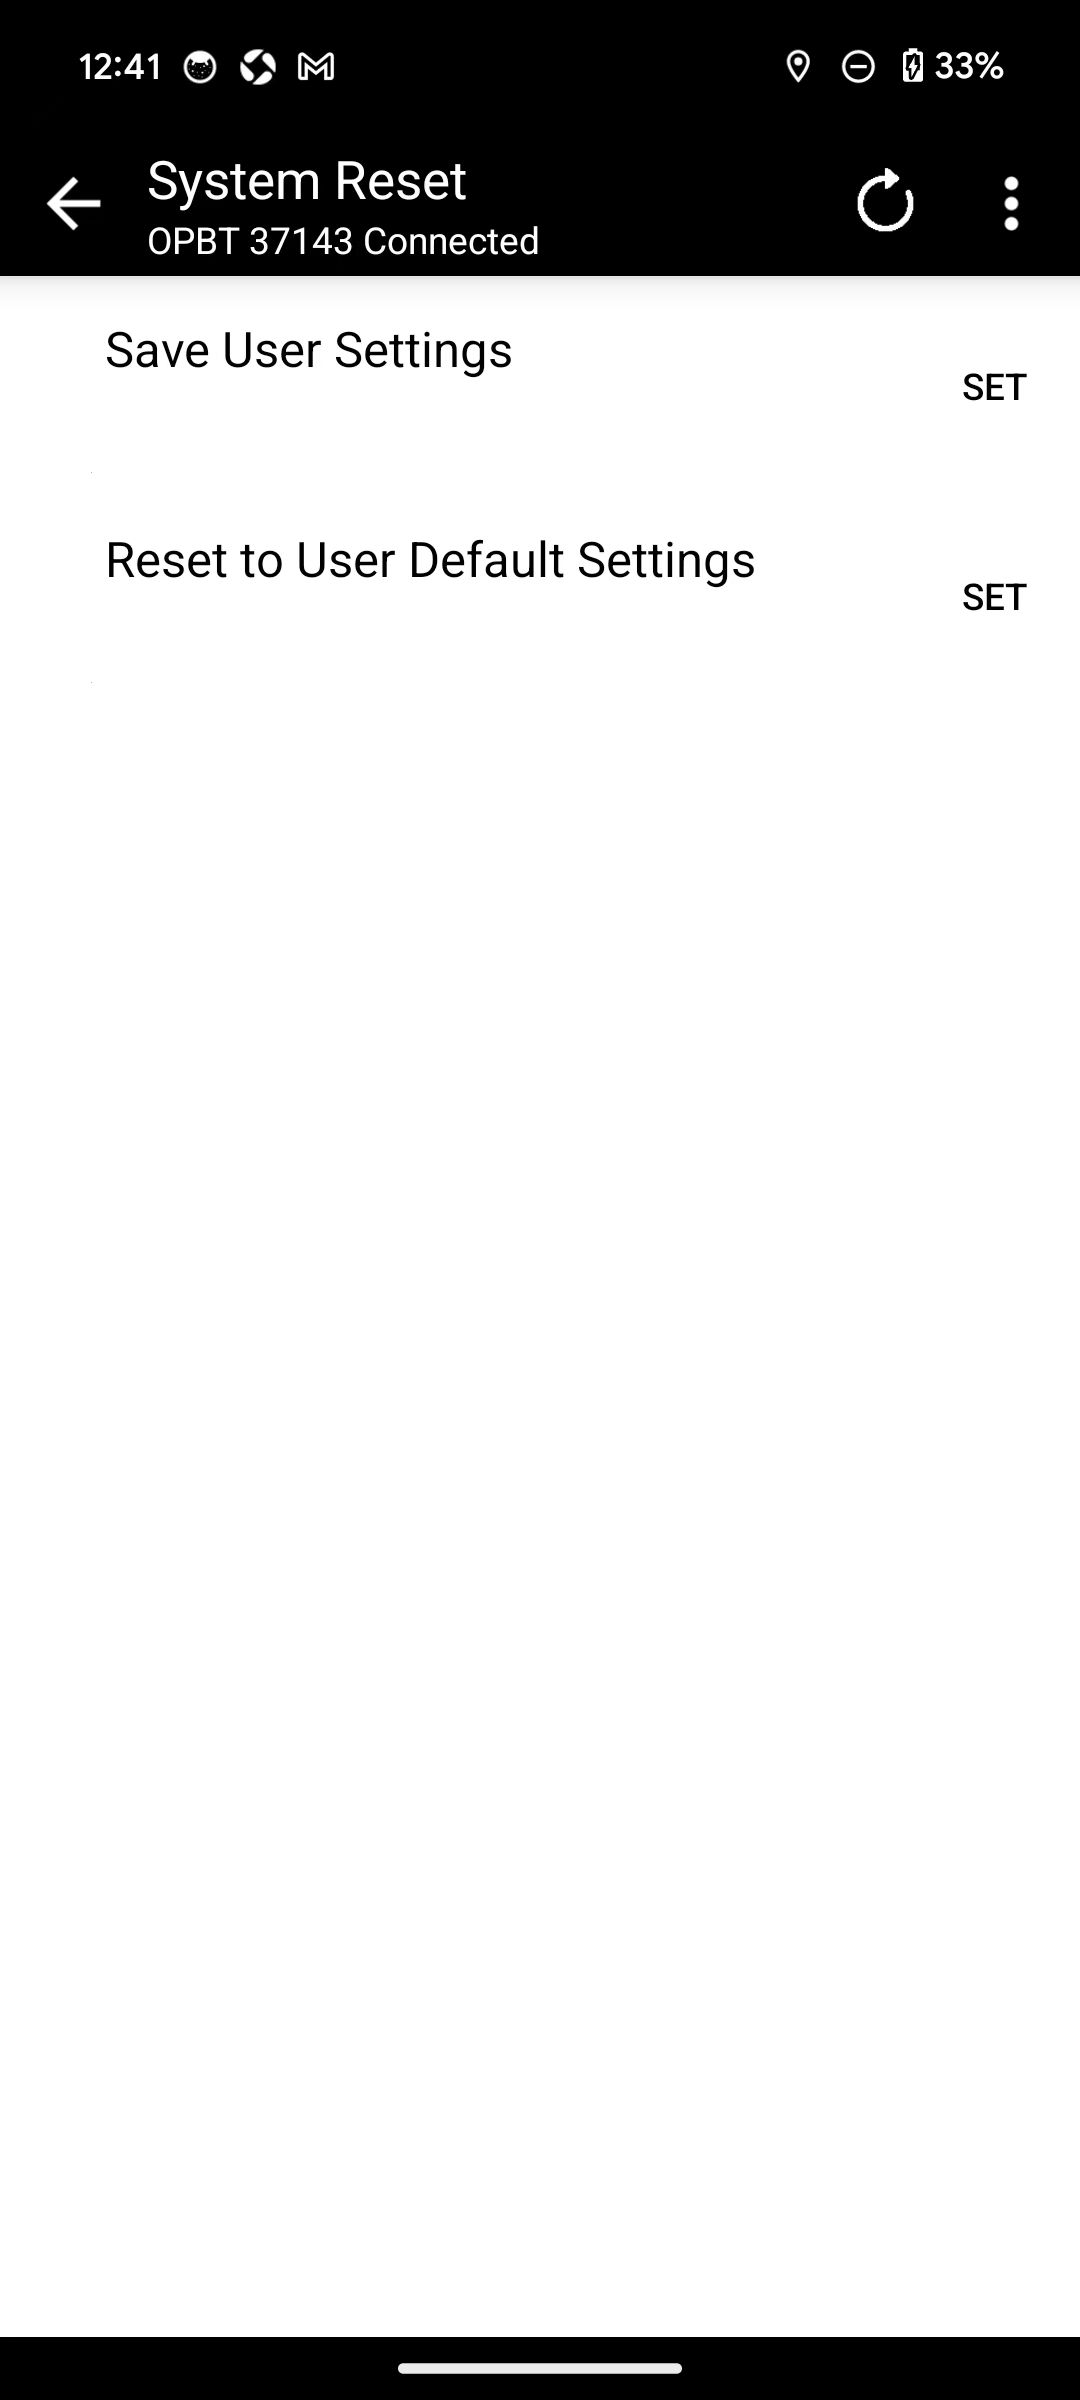
Reset device
15. FAQ and version information
15.1 Bluetooth cannot connect / permissions
- Confirm the optical probe is powered on and Bluetooth is enabled on the phone or PC.
- Mobile: confirm Bluetooth and (if needed) Location permissions; toggle Bluetooth off/on in system settings and retry. Permissions and first-launch notes: Installation Guide.
- Restart the device and the phone / PC, then try again.
15.2 Desktop serial cannot connect or port list looks wrong
- Confirm the connection method is Serial, and that port, baud rate, and other parameters are correct.
- Windows: Bluetooth virtual serial ports often appear as
COMx - device name; if the target port is missing, check drivers and pairing, or use BLE instead. - Close other software that holds the COM port, then retry.
15.3 Firmware upgrade red-LED mode / upgrade failed
- Confirm both red LEDs are blinking; if green, press reset / menu to switch to red-LED mode.
- Keep sufficient charge; do not power off, move far away, or unplug during upgrade.
- On the BLE path, reselect the device in upgrade mode from the upgrade list.
- After failure, review the log and retry in place; if it still fails, note model, app version, and logs when contacting support.
15.4 macOS cannot open the app (Gatekeeper)
- Control-click → Open, or allow the app under System Settings → Privacy & Security. Full steps: macOS / Gatekeeper section in the OP Manager Installation Guide.
15.5 Windows Store build vs zip build
- They are independent install entities and can coexist; settings and data may not sync. When uninstalling or upgrading, confirm which install source you are changing. Channel details: Installation Guide.
15.6 Parameters lost after reboot
- Runtime changes exist only for the current session unless you tap the parameter-page save icon, or persist via Reset device → Save configuration. See §6.
15.7 Language unchanged after switching
- Mobile: restart the app.
- Desktop: switching in settings should apply immediately; if not, close the settings dialog and check the main UI again.
15.8 Failed to read / write parameters
- Confirm the top status has reached device Connected, not still “Entering parameter mode / Reading configuration”.
- Check charge and distance; move closer and retry.
15.9 Version information and support
- This manual applies to: OP Manager V2.1.41
- For a version change summary, see the Version History section on the OP Manager product page.
- When reporting issues, include: steps, screenshots, device model, OS version, and app version.
Send the above to support for troubleshooting. Install and download channels: Installation Guide and product page.
End of document.